If your reel mower is leaving behind ragged grass instead of a clean, crisp cut, it is likely time to sharpen the blades. Unlike gas-powered rotary mowers that tear grass, reel mowers rely on a precise scissoring action between rotating helical blades and a fixed bedknife. This guide walks you through how to sharpen a reel mower with a file, covering safety, technique, adjustment, and verification. Whether you are maintaining a modern push reel mower or restoring a vintage model, this method delivers sharp, efficient cutting and extends your mower is life for years.
Secure the Mower Properly Before Sharpening
Before touching any blades, ensure the mower will not shift during work. Place the reel mower upright on a stable surface such as a workbench or garage floor. Block the wheels if needed to prevent rolling. Work in a well-lit area so you can clearly see blade edges and contact points. Wear heavy-duty gloves at all times because reel blades are sharp even when dull.
Rotate the reel manually to bring each blade into position for filing. Most models allow full access without disassembly.
Inspect Reel Blades and Bedknife Before Filing
Check the blades and bedknife for wear and damage before beginning. Look for nicks, rust, pitting, or uneven wear on the reel blades and bedknife. A healthy blade edge reflects light uniformly, while dull spots appear dark or discolored. The bedknife should be straight and free of gouges. If bent or heavily pitted, it may need replacement or professional grinding.
Manually spin the reel to check the cutting action. If it turns freely but makes a light scraping sound, the blades are likely still in contact with the bedknife. No sound indicates the gap may be too wide, while excessive resistance means the blades may be binding.
Never file the bedknife unless necessary. Only sharpen it if pitted or corroded, and always preserve its original angle.
File the Reel Blades Correctly

Choose the right file for this task. Select a 10 to 12 inch mill bastard file (medium cut) or a 1-inch metal file for better control. Attach a file handle for safety and consistent pressure. Avoid coarse files because they remove too much metal and can damage the edge.
Use forward strokes only when filing the blades. Stabilize the blade by inserting your gloved hand between the blades and gripping the blade bar to stop rotation. Place the file flat against the cutting edge of the blade and match the existing 30-degree relief angle. Do not create a new bevel.
Pull the file toward you in a single, controlled stroke. Lift the file after each stroke. Never push back because this dulls the file and chips the edge. Use even pressure across the full length of the blade. Gently rock the file to match the blade is curvature, ensuring full edge contact. Focus on the leading edge where contact with the bedknife occurs.
Repeat this process for each of the 5 to 7 helical blades. Rotate the reel to access the next blade and repeat the sharpening technique. A full reel typically takes 15 to 20 minutes depending on rust and wear.
Monitor Sharpening Progress
Look for a shiny, uniform edge as you file. Dull or corroded metal will give way to bright, reflective steel. Pits and minor nicks will smooth out with consistent strokes. Stop when the entire edge appears uniformly polished with no dark spots.
Test sharpness safely by lightly running your fingertip along the edge (not across it). You should feel a clean bite. If it feels smooth, continue filing until it catches slightly. Never test by cutting paper at this stage because the bedknife may still be misaligned.
Sharpen the Bedknife Only If Needed
Only sharpen the bedknife if it is pitted, corroded, or no longer making contact. Remove the bedbar first by unscrewing the bedknife fasteners. Use a socket wrench and correct bit to remove screws. Discard old screws and replace with new ones to prevent thread failure. Clean the surface by scraping off rust and debris with a wire brush or scraper. Wipe clean with a dry cloth.
Never use an impact wrench because it can warp the bedbar.
File the top surface of the bedknife. Lay the file flat on the top grind surface of the bedknife. Maintain the original top grind angle. Use long, even strokes from one end to the other. Remove only enough material to restore a flat, smooth surface.
For hardened steel such as EdgeMax, use a diamond-coated file or stone because standard files will glaze over.
Preserve the lead-in chamfer. Many bedknives have a lead-in bevel to guide grass into the cutting zone. Re-file this chamfer if worn but maintain its original angle and length.
Reinstall and Torque the Bedknife Properly
Proper reassembly prevents warping. Lightly oil the bedbar with gun oil or WD-40 to prevent corrosion. Install new screws with anti-seize lubricant on the threads only, not the head taper.
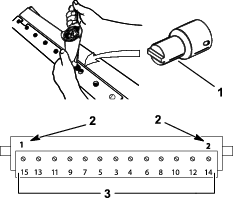
Tighten in sequence to ensure even pressure. Start with outermost screws and tighten to 10 inch-pounds (1 N·m). Then tighten remaining screws in an alternating pattern to 200 to 250 inch-pounds (23 to 28 N·m). Uneven torque warps the bedknife, creating gaps and poor cuts.
Adjust Reel-to-Bedknife Clearance
Set the microscopic gap correctly. The blades must almost touch the bedknife but not rub. Use the adjustment bolts to make changes. The top bolt raises or lowers the bedknife, while the bottom bolt locks the position. Adjust both sides identically to keep the bedknife parallel.
To tighten the gap, tighten the top bolt and loosen the bottom bolt slightly. To loosen the gap, loosen the top bolt and tighten the bottom bolt. Make small one-eighth-turn adjustments and test frequently.
Verify the Cut with the Paper Test
Perform a simple quality check using paper. Slide a standard piece of printer paper between the reel and bedknife. Rotate the reel by hand, turning the drive wheel or reel shaft slowly.
Look for a clean cut. The paper should be sliced cleanly, not torn or dragged. If it tears, the gap is too wide. If the reel binds, the gap is too tight, so loosen slightly.
Re-check after the first few minutes of mowing because components settle and may need fine-tuning.
Restore Performance with Lapping (Optional)
For deep restoration or vintage mowers, use lapping. Combine filing with lapping when blades look sharp but do not cut well. This method polishes the interface between blades and bedknife.
Remove the left drive wheel first. Pop off the cover, pry out the U-ring, lift off the wheel and cogged gear. Attach a hand crank or drill adapter to the exposed drive shaft.
Apply lapping compound. Brush a thin bead onto the blade edges. Turn counterclockwise (reverse of mowing direction) for 5 to 10 minutes. Use drill on low speed if available.
Clean and reassemble. Wipe off all compound and reinstall gear, wheel, U-ring, and cover.
Lubricate and Maintain Your Reel Mower
Keep the mower running smoothly with regular maintenance. Before every mow, apply a drop of oil to the gears. Every few weeks, use plant-based bike chain lube on gears and bearings. After each use, wipe down blades and check for grass buildup.
Reel mowers produce zero emissions, unlike gas models that pollute like 11 cars.
Test Cut Quality in the Yard
Listen, look, and feel the results. A healthy mower makes a rhythmic snickety-snick sound. No noise indicates the gap is too wide, while grinding means it is too tight.
Grass tips should be neatly trimmed, not brown or shredded. No missed strips or uneven patterns should appear. Mow over Bermuda or bentgrass because fine blades reveal imperfections instantly.
Troubleshoot Common Issues
Address problems quickly to maintain performance.
Grass not cutting indicates dull blades or wide gap. Re-file and adjust the gap. Mower binds when the gap is too tight or the reel is bent. Loosen the gap and inspect for damage. Uneven cut results from misaligned bedknife. Re-level and re-torque. Vibration occurs from bent reel or loose parts. Inspect and tighten. Rapid dulling happens from wrong angle or overheating. Re-file at 30 degrees and use light strokes.
Heat warning: Filing too aggressively softens steel. Use light strokes and let blades cool.
Follow a Maintenance Schedule
Keep your mower in top condition with regular care.
Lubricate gears before every mow (oil) or every few weeks (grease). Inspect blades monthly during season. Sharpen blades at least once per year. Check blade gap after sharpening and seasonally. Clean mower after each use.
Key Takeaways for Sharpening a Reel Mower with a File

Sharpening a reel mower with a file is about preserving precision. The scissoring action depends on microscopic alignment, so every stroke and adjustment matters. Stick to the 30-degree relief angle, use forward-only filing, and always verify with the paper test. For neglected mowers, combine filing with lapping for a like-new cut.
With proper care, a reel mower can last decades. Many vintage models are built like tanks. Annual sharpening keeps them efficient, eco-friendly, and quiet. When you hear that sweet snickety-snick again, you will know you have done it right.
Now go forth, sharpen, mow, and enjoy a healthier, cleaner-cut lawn.
Frequently Asked Questions About Sharpening a Reel Mower with a File
How often should I sharpen my reel mower blades?
Sharpen reel mower blades at least once per year. More frequent sharpening may be needed in sandy or abrasive conditions or with heavy use.
Can I use any type of file to sharpen reel mower blades?
Use a 10 to 12 inch mill bastard file (medium cut) or a 1-inch metal file. Avoid coarse files because they remove too much metal and can damage the edge.
Do I need to remove the bedknife to sharpen it?
Only remove the bedknife if it is pitted, corroded, or not making contact. For routine filing, you can sharpen the reel blades without removing the bedknife.
What is the correct relief angle for reel mower blades?
Maintain the factory 30-degree relief angle with a range of 25 to 35 degrees. This angle ensures proper cutting action without damaging the blade geometry.
How do I know if my reel mower is properly adjusted after sharpening?
Perform the paper test by inserting a sheet between the reel and bedknife. The paper should cut cleanly when you rotate the reel by hand. Also listen for the rhythmic snickety-snick sound during mowing.