
You fire up your snow blower on a fresh powder morning, pull the auger engagement lever, and… nothing happens. The engine runs strong, but the impeller sits motionless while snow piles up untouched. This frustrating scenario strikes thousands of homeowners each winter precisely when they need their machines most. Whether you’re dealing with a single-stage unit that won’t throw snow or a dual-stage model where the impeller refuses to spin, the underlying causes follow predictable patterns that you can diagnose and fix yourself.
This guide delivers the exact steps to identify why your snow blower impeller won’t turn and how to fix it quickly. You’ll learn to distinguish between a simple shear bolt replacement and serious gearbox failure—saving time, money, and the headache of waiting for professional service during a major snow event. Most impeller failures can be resolved in under an hour with basic tools and the right diagnostic approach.
Spot the Difference Between Single-Stage and Dual-Stage Failures
Your first critical step is identifying your snow blower type because repair procedures differ significantly between single-stage and dual-stage models. Single-stage units use one rotating auger to both collect and throw snow through the chute, typically handling lighter accumulations up to 6 inches deep. When the impeller won’t turn on these models, you’re actually troubleshooting the auger system since both functions are performed by the same mechanism.
Dual-stage snow blowers separate the workload: the auger gathers snow and feeds it to the impeller, which then propels it through the chute. These machines tackle heavier snowfalls of 12 inches or more. Impeller failure here involves a more complex system with multiple components working together. Look for model numbers on your machine’s housing or check the owner’s manual—dual-stage models feature larger auger housings and often include self-propelled drive systems that single-stage units lack.
Immediate Visual Checks That Solve 80% of Problems

Start every diagnosis with these five-minute visual inspections that often reveal the culprit without tools. Check all drive belts first—remove the belt cover (typically held by 2-4 bolts) and inspect for cracks, fraying, or missing chunks of rubber. A broken belt appears as a loose loop hanging from pulleys, while a stretched belt sits too low in the pulley grooves and slips under load.
Examine shear bolts immediately after belts—these safety devices connect the auger to the drive axle. On dual-stage models, locate them where the auger halves meet the central gearbox. Broken shear bolts leave the auger spinning freely by hand while the drive axle remains stationary. Test auger movement with the engine off and spark plug disconnected—try rotating the auger assembly by hand. It should turn with slight resistance. Complete inability to turn indicates seized bearings or gearbox failure, while excessive wobbling suggests worn auger bearings.
Identify Belt Damage Patterns in Minutes
Cogged V-belts feature teeth on the underside and handle high-torque applications but can lose teeth or crack along the cogs. Non-cogged V-belts rely on friction and stretch over time, causing slippage. Flat belts on older models fray along the edges first. Check belt tension by pressing on the longest span between pulleys—a properly tensioned belt deflects about ½ inch under finger pressure. Excessive slack means stretching or worn pulley grooves.
Replace Drive Belts Without Making Costly Mistakes
Belt problems cause 60% of impeller and auger failures. Never replace just one belt—if one failed, others likely suffer similar wear. Always use OEM-specified belts; automotive belts may fit but won’t handle the constant engagement cycles of snow blower operation.
Belt Replacement Done Right
- Disconnect the spark plug wire for safety before any work begins
- Remove the belt cover using the appropriate socket or wrench
- Photograph the belt routing with your phone to ensure correct reinstallation
- Release tension by moving the idler pulley away from the belt
- Slide the old belt off all pulleys carefully
- Install new belts following the exact routing pattern
- Test engagement by pulling the auger drive handle before starting the engine
This process takes 20-30 minutes for most models. Critical mistake to avoid: Installing belts backward on cogged designs—this causes immediate failure and potential damage to pulleys.
Broken Shear Bolt Fix That Takes 5 Minutes
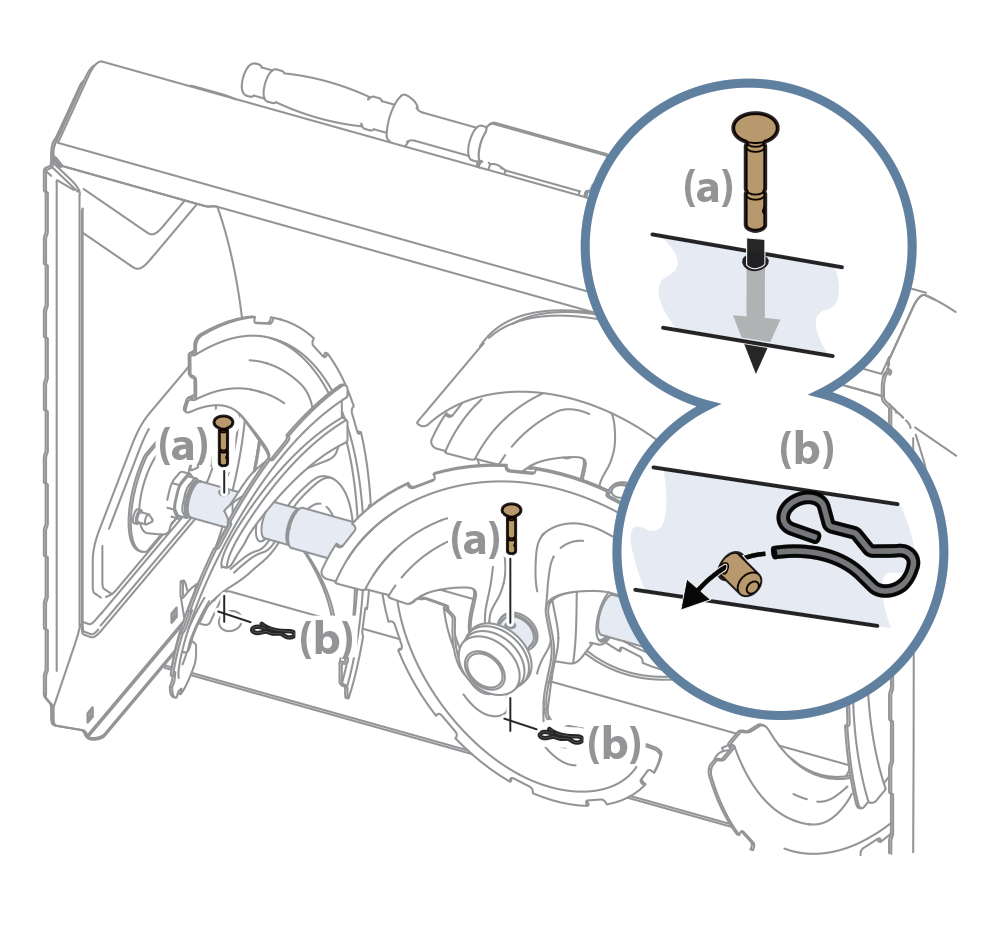
Shear bolts protect expensive components by breaking when the auger hits immovable objects. This intentional failure prevents engine or transmission damage but leaves your impeller motionless. Never replace shear bolts with standard hardware—these specialized bolts feature a weakened section designed to break under specific torque loads. Using regular bolts risks destroying the gearbox.
Replace Shear Bolts Correctly
- Remove broken bolt remnants using pliers or proper socket
- Clean bolt holes thoroughly of debris or rust
- Align auger and drive axle holes perfectly before insertion
- Insert new shear bolt through both components
- Tighten nut to manufacturer specifications (usually finger-tight plus ¼ turn)
- Test rotation by hand before starting the engine
Stock spare shear bolts in your snow blower storage area. Most failures occur during the first major snowfall when parts suppliers may be closed for days.
Diagnose Seized Bearings Before Winter Hits
Auger bearings enable smooth rotation while handling tremendous loads. These maintenance-critical components seize without regular lubrication, creating complete impeller failure. Test bearing condition with the spark plug disconnected—attempt to spin the auger by hand. Good bearings allow smooth rotation with slight resistance, while seized bearings prevent any movement or create grinding sensations.
Check for side-to-side play by pushing and pulling the auger blades. Excessive movement indicates worn bearings that will soon fail completely. Rust streaks around bearing housings signal water infiltration and impending seizure. Lubricate serviceable bearings every 25 operating hours or annually—sealed bearings require complete replacement when worn.
Recognize Gearbox Failure Before It Costs You
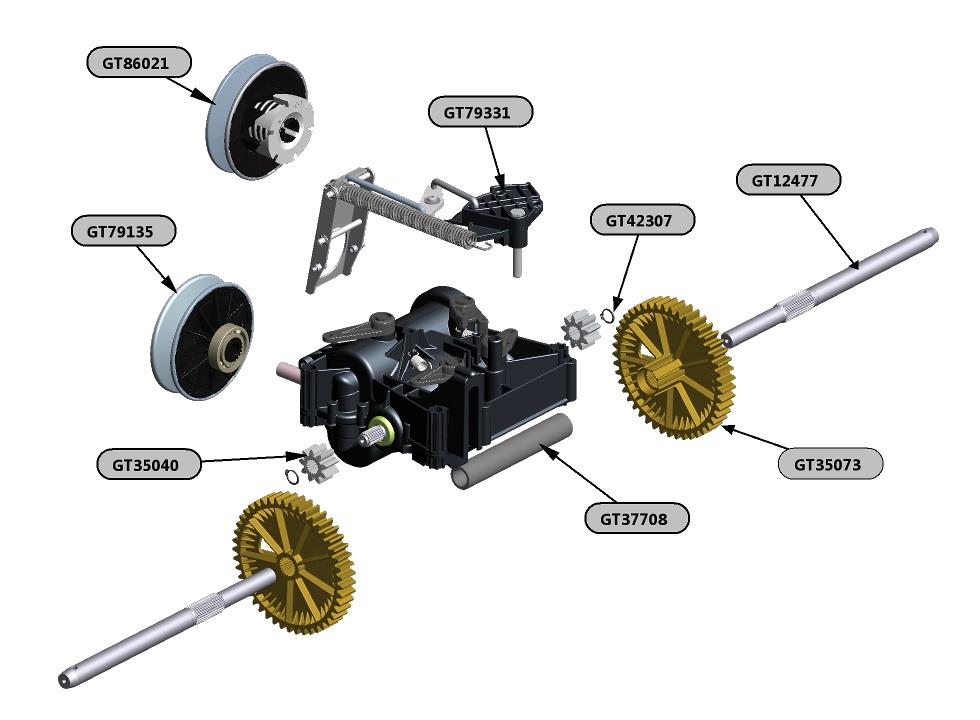
Dual-stage snow blowers use gearboxes to transfer power to the auger and impeller. Gearbox failure represents the most expensive repair, often exceeding the machine’s value on older units. Primary symptom: The main drive shaft spins when engaged, shear bolts remain intact, but neither auger nor impeller turns, indicating stripped gears inside the housing.
Listen for grinding sounds when engaging the auger drive. Metal-on-metal noises from the gearbox area signal gear teeth stripping or bearing failure. Oil leaks around gearbox seals indicate internal damage and imminent failure. Before replacing a gearbox ($200-400 plus labor), compare repair costs to replacement value—generally, repairs exceeding 50% of replacement cost warrant considering a new unit, especially on snow blowers over 7 years old.
Prevent Impeller Failures With Seasonal Maintenance
Proactive maintenance eliminates most impeller failures before they strand you during a storm. Before the first snowfall, inspect all belts for cracks or glazing, check shear bolt condition, lubricate all grease fittings, and test auger rotation. Mid-season, clean belt covers of snow and ice buildup, re-grease bearings after 10-15 hours of use, and check belt tension.
End-of-season storage is critical: run the machine dry of fuel or add stabilizer, grease all fittings heavily for storage, store with the auger disengaged to relieve belt tension, and cover the machine to prevent moisture damage. Stock essential spare parts including drive belts, shear bolts (4-6 spares), grease fittings, and belt cover bolts—create a simple parts diagram showing belt routing and shear bolt locations for quick field repairs.
When Professional Help Saves You Money
Some situations require expert diagnosis. Seek professional service when gearbox replacement is needed on units under 5 years old (check warranty coverage first), bearing replacement requires hydraulic press work, multiple component failures occur simultaneously, or electrical clutch problems accompany mechanical issues.
Estimate repair costs before proceeding: belt replacement ($50-150 DIY vs shop), bearing replacement ($100-300), gearbox rebuild ($400-800), and complete auger assembly ($150-400). Most impeller failures stem from three sources: worn belts, broken shear bolts, or seized bearings. Quick visual inspection followed by targeted repairs gets you back to clearing snow within hours—not days. Keep spare parts on hand, follow seasonal maintenance schedules, and you’ll rarely face a snow-covered driveway with a non-functional machine.


