
Your snow blower roars to life, but the auger sits frozen while snow buries your driveway. That sinking feeling hits when you realize you’re facing a manual shovel job in freezing temperatures. When your snow blower auger not spinning, it’s not just inconvenient—it halts winter cleanup completely. This common failure strikes precisely when you need your machine most, but here’s the good news: 90% of these issues stem from just five fixable components you can diagnose in under 30 minutes.
Whether you own a compact single-stage unit for light snow or a heavy-duty dual-stage model for blizzards, the auger drive system follows predictable failure patterns. This guide cuts through the confusion with a step-by-step troubleshooting sequence proven to resolve most “auger not turning” emergencies. You’ll learn exactly where to look first—and how to avoid costly service calls when simple fixes will get you back in action.
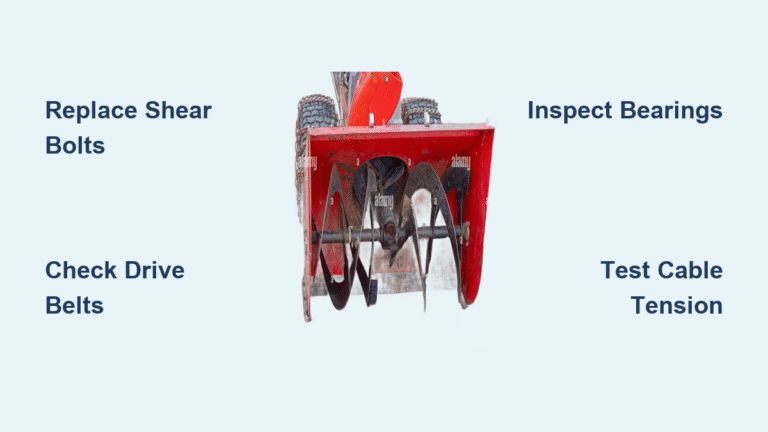
Replace Broken Shear Bolts Before Checking Anything Else
Shear bolts failing represent the overwhelming culprit behind snow blower auger not spinning scenarios. These engineered weak points sacrifice themselves when your auger strikes hidden obstacles like rocks or ice chunks, protecting your engine and transmission from catastrophic damage. Ignoring this first-check wastes precious time when snow keeps falling.
Spot Shear Bolt Failure in 60 Seconds
Single-stage models: Crawl under the auger housing and locate the bolts connecting the paddle assembly to the central shaft. Broken pins show obvious gaps where the bolt head should be, or you’ll see jagged metal fragments protruding from the shaft. If the auger spins freely by hand with the engine off, that’s your smoking gun.
Dual-stage models: Focus on both ends of the auger shaft where it meets the gearbox. You’ll typically find two shear bolts—one per auger half. Check for bent shafts or misaligned holes that prevent proper bolt seating. A telltale sign is one auger section turning while the other stays frozen during operation.
Pro tip: Always disconnect the spark plug wire before inspection. Frozen augers can suddenly release stored energy when you remove obstructions, causing dangerous spinning.
Install New Shear Bolts in Under 15 Minutes
Critical replacement steps:
1. Rotate the auger until the drive shaft and auger holes align perfectly
2. Insert the manufacturer-specified bolt (never substitute with standard hardware)
3. Hand-tighten the nut just enough to allow slight movement—over-tightening defeats their protective purpose
4. Never skip this: Test rotation by hand before restarting the engine
Warning: Using regular bolts instead of shear pins risks $300+ transmission repairs. Keep model-specific spares in your snow removal kit—they cost under $5 and prevent mid-storm breakdowns.
Diagnose Drive Belt Failures Causing Auger Immobility
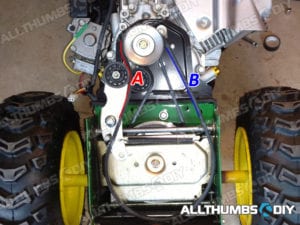
When your snow blower auger not spinning despite intact shear bolts, worn drive belts become the prime suspect. These rubber components stretch and crack from winter use, losing grip on pulleys precisely when heavy, wet snow demands maximum torque. A slipping belt often announces its failure with a high-pitched squeal during engagement.
Identify Belt Damage Without Tools
Critical visual checks:
– Shine a flashlight along the belt’s entire length for frayed edges or separated cogs
– Press the belt sideways—it should deflect only 1/2 inch maximum
– Look for glazing (shiny spots) indicating heat damage from slippage
– Check pulley alignment: Belts must sit flush in grooves, not riding on edges
Troubleshooting trick: With the engine off, manually rotate the auger while watching the belt. If it jumps or skips teeth on pulleys, immediate replacement is required.
Route Replacement Belts Correctly in 45 Minutes
Single-stage models: Loosen the engine mounting bolts to create slack, slip the old belt off pulleys, and thread the new belt following the diagram stamped inside the belt cover. Always take a photo before disassembly—many homeowners reverse the routing on reassembly.
Dual-stage complexity: These require replacing both the auger drive and impeller belts. Start by removing the auger housing cover (typically 4-6 bolts), then carefully trace the old belt’s path. Critical mistake to avoid: Forcing belts over pulleys instead of sliding them into grooves. This causes premature wear and that annoying “auger not spinning” recurrence.
Confirm Seized Auger Bearings Are Not Locking Your System
When belts and shear bolts check out but your snow blower auger not spinning, frozen bearings become the hidden culprit. These components support the auger shaft inside the housing, and when they seize from moisture intrusion or lack of lubrication, they literally lock the entire assembly solid.
Perform the Hand-Spin Diagnostic Test
Essential safety first: Disconnect the spark plug and tilt the machine to access both ends of the auger shaft. Grip the shaft stubs firmly and attempt to rotate. Warning signs:
– Complete resistance with no movement
– Grinding sensation through the shaft
– Visible rust trails around bearing housings
– Uneven rotation with “catch points”
Pro insight: Bearings often fail asymmetrically. If one side spins while the other drags, that seized bearing is your target—don’t waste time replacing both unless inspection confirms dual failure.
Execute Precision Bearing Replacement
Replacement protocol:
1. Remove the auger assembly by unbolting the housing (consult manual for fastener locations)
2. Use a bearing puller—not a hammer—to extract the old bearing without damaging the shaft
3. Pack the new bearing with waterproof grease before installation
4. Press the replacement bearing into place with even pressure on the outer race only
Time-saver: Heat the new bearing with a hair dryer for 2 minutes before installation—it expands slightly for easier seating. Never strike the inner race with tools, as microscopic dents cause premature failure.
Inspect Auger Assembly Damage Mimicking Drive Failure
Worn paddles or bent blades can create the illusion that your snow blower auger not spinning when the drive system actually functions. Single-stage models suffer most from rubber paddle degradation, while dual-stage units face blade deformation after impact events that should have broken shear bolts.
Identify Critical Wear in Single-Stage Paddles
Replacement triggers:
– Rubber thickness reduced below 3/8 inch at contact points
– Metal reinforcement cores visibly exposed
– Uneven wear creating “snow skipping” patterns
– Cracks extending from paddle edges toward the hub
Fix strategy: Most manufacturers sell individual paddle kits. Remove retaining clips with needle-nose pliers, slide off worn sections, and install new paddles in under 30 minutes. Never ignore minor wear—exposed metal cores accelerate housing abrasion.
Address Dual-Stage Blade Damage After Obstacle Strikes

Post-impact checklist:
1. Verify shear bolts actually broke (if intact, internal damage likely occurred)
2. Rotate the auger manually to check for blade-to-housing contact
3. Measure blade clearance—should maintain 1/8 inch minimum gap
4. Look for twisted mounting tabs that throw blades off-balance
Critical correction: Bent blades cause violent vibration that destroys bearings. If you spot even slight warping, replace the affected section immediately—don’t risk further damage.
Adjust or Replace Faulty Auger Drive Cables Immediately
A malfunctioning control cable creates classic “auger not spinning” symptoms even with perfect belts and shear bolts. When this cable stretches, frays, or detaches, it fails to transmit your lever input to the engagement mechanism. The most dangerous scenario occurs when the auger won’t disengage—creating a serious safety hazard.
Calibrate Cable Tension in 5 Minutes
Adjustment sequence:
1. Locate the barrel adjuster near the control lever housing
2. Turn clockwise to increase tension (auger engages faster)
3. Test by pulling the lever—auger should start within 1 inch of travel
4. Back off if auger fails to stop when releasing the lever
Warning: Never overtighten to compensate for wear. This strains the engagement mechanism and causes premature belt wear.
Swap Damaged Cables Before Next Storm
Replacement essentials:
– Match the cable’s bend radius and housing length exactly
– Maintain all factory retaining clips in original positions
– Lubricate new cables with silicone spray (never oil)
– Test full travel range before final assembly
Pro tip: Coat cable ends with dielectric grease during installation—it prevents ice buildup that causes seasonal stiffness.
Confirm Gearbox Failure Only After Eliminating Simpler Causes
Gearbox issues cause snow blower auger not spinning exclusively in dual-stage models, but they’re far less common than belt or shear bolt failures. Before condemning this expensive component, verify that the main drive shaft rotates when the engine runs—indicating power reaches the gearbox.
Identify True Gearbox Failure
Definitive tests:
– With shear bolts removed, try spinning the auger by hand (should rotate freely)
– If the main shaft spins but auger remains frozen, inspect gearbox output
– Listen for grinding during operation—distinct from belt squeal
– Check for oil leaks around gearbox seals (indicates seal failure)
Critical distinction: A seized auger bearing feels solid when you try to rotate the shaft. A failed gearbox often allows slight “play” in the shaft with grinding resistance.
Approach Gearbox Replacement Strategically
Replacement reality: This 2-hour job requires specialty tools like torque wrenches and seal pullers. Unless you’re mechanically experienced, seek professional help—improper installation causes misalignment that destroys new gearboxes. Always replace the oil seal during reassembly to prevent immediate oil leaks.
Prevent Recurring Auger Failures With Smart Maintenance
Implement the 5-Point Winter Readiness Checklist
Before each storm:
– Verify shear bolts aren’t showing stress marks
– Confirm belt tension allows 1/4 inch deflection
– Lubricate auger shaft ends with silicone spray
– Clear ice buildup from housing openings
– Test auger engagement at idle speed
Season-ending protocol: Run the machine dry of fuel, then spray the auger assembly with corrosion inhibitor. Store with the drive lever disengaged to prevent belt tension fatigue.
Build Your Emergency Repair Kit
Non-negotiable spares:
– 3 model-specific shear bolts (check manual for part numbers)
– One drive belt (measure old belt or bring to hardware store)
– Waterproof bearing grease in a squeeze tube
– Cable lubricant spray
– Zippered bag for organizing small parts during repairs
Pro strategy: Label replacement parts with your model number using permanent marker—snow emergencies aren’t the time for part identification delays.
When your snow blower auger not spinning halts winter cleanup, systematic troubleshooting saves hours of frustration. Start with shear bolts and belts—the culprits in 80% of cases—before progressing to bearings and cables. Remember that frozen augers often stem from preventable wear when you ignore early warning signs like belt squeal or lever stiffness. By keeping model-specific spares on hand and performing 10-minute pre-storm checks, you’ll transform breakdown anxiety into confidence that your machine will conquer whatever winter delivers. The difference between a 15-minute fix and a service call comes down to knowing exactly where to look first—and now you do.


