
When your riding lawn mower won’t start and the battery isn’t charging, it can halt your yard work fast. The most common cause is a bad charging system—often a failed alternator, voltage regulator, or simple wiring issue. Quick fix first: clean and tighten the battery terminals, check the fuse, and test the battery voltage. Many cases are solved by a loose belt or blown fuse.
In this complete guide, you’ll learn every likely cause of a riding lawn mower battery not charging, exactly how to diagnose the charging system, and step-by-step fixes from simple checks to component replacement. By the end, you’ll know how to test your battery, alternator/stator output, regulator/rectifier, key switch circuit, and more—plus prevention tips to avoid repeat failures.
Common Causes of a Riding Lawn Mower Battery Not Charging
- Corroded or loose battery connections
- Blown charging fuse or fusible link
- Faulty alternator/stator under the flywheel
- Bad voltage regulator/rectifier
- Loose or slipping engine-to-alternator belt (on belt-driven systems)
- Faulty key switch or wiring (especially charge lead)
- Damaged diode in inline charge wire (single-wire systems)
- Shorted PTO clutch or headlights overloading the system
- Dead or sulfated battery that won’t accept charge
- Poor ground connection from engine/frame to battery negative
How to Fix a Riding Lawn Mower Battery Not Charging
Method 1: Quick Checks and Easy Fixes
Diagnosing the Issue
Time: 10–20 minutes
Tools: Multimeter, wire brush, 10mm/12mm wrenches, dielectric grease
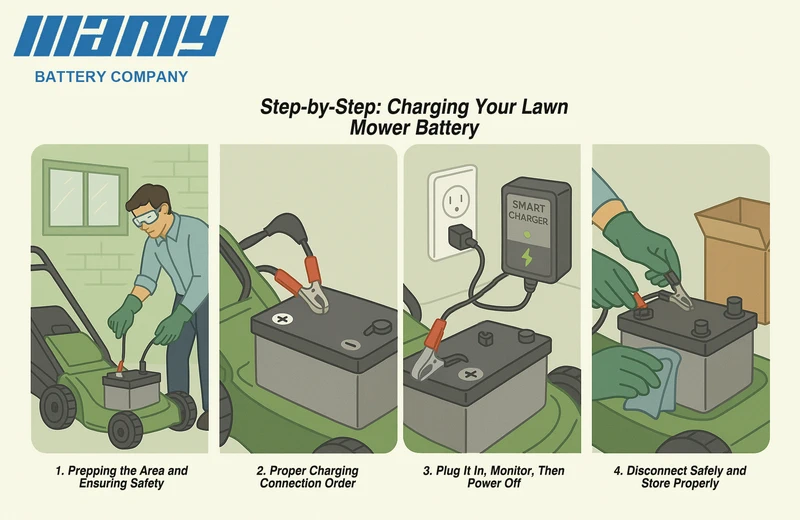
- Safety first: turn the mower off, remove the key, set the parking brake, and disconnect the negative battery cable first.
- Visual inspection: check battery terminals, grounds, and the main wiring harness for corrosion, burns, or breaks.
Fix Steps
- Clean and tighten terminals:
– Remove both battery cables (negative first), scrub posts and clamps with a wire brush or baking soda paste (1 tbsp baking soda in 1 cup water).
– Rinse/dry, apply a thin layer of dielectric grease.
– Reconnect positive first, then negative; tighten firmly. - Check the fuse:
– Look for an inline fuse near the battery/solenoid (commonly 15–30A blade fuse). Replace if blown with the same rating. - Inspect grounds:
– Remove and clean frame-to-battery negative ground and engine ground strap. Reattach tightly. - Check belt (if applicable):
– On some tractors, a belt drives the alternator or starter-generator. Ensure proper tension and no glazing/cracks. - Quick voltage check:
– With engine off, measure battery voltage: 12.4–12.7 V is healthy. Below 12.2 V indicates low charge.
Testing
- Start the engine and set to full throttle. Measure battery voltage across the posts:
- 13.4–14.6 V: Charging normally.
- 12.2–12.8 V: Not charging—continue to Method 2.
- Over 15 V: Overcharging—regulator likely bad.
Method 2: Test the Battery and Charging Output
Diagnosing the Issue
Time: 20–30 minutes
Tools: Multimeter, battery charger, load tester (optional)
Fix Steps
- Fully charge the battery:
– Use a smart 12V charger (2–10A) until full. Then rest 1 hour. - Open-circuit voltage check:
– 12.6–12.8 V: Good
– 12.4–12.5 V: Fair
– ≤12.2 V after charging: Battery may be sulfated/bad—consider replacement. - Cranking voltage test:
– While starting, measure battery. If it drops below 9.6 V, the battery is weak or there’s high resistance. - Running voltage test:
– At full throttle with no loads on, measure battery: expect 13.4–14.6 V. If still ~12.6 V, the charging system isn’t delivering power.
Testing
- If the mower runs but shows no increase above 12.8 V at the battery, proceed to alternator/stator and regulator testing.
Method 3: Identify Your Charging System Type and Test Components
Riding mowers use one of three common charging setups:
1) Coil stator under flywheel + external regulator/rectifier (most Briggs & Stratton, Kohler, Kawasaki)
2) AC stator with diode in charge lead (simple single-wire system)
3) Starter-generator belt-driven (older models)
Phase 1: Stator/Alternator Testing
Tools: Multimeter with AC and DC modes
A) Two-wire stator (AC output to external regulator)
– Locate two same-color stator wires under the flywheel going to a voltage regulator module.
– Test AC output:
1. Disconnect the stator connector from the regulator.
2. Set meter to AC volts.
3. Start engine, throttle up. Probe across the two stator wires.
4. Expect 28–36 VAC at full throttle (varies by engine; 14–28 VAC at mid-throttle).
– If AC is low or zero:
– Check for broken wires or melted plug.
– If wiring is good, stator or flywheel magnets may be faulty—replace stator (and inspect magnets).
B) Single-wire stator with inline diode (DC trickle charge)
– Identify a single wire from under flywheel going to battery via a diode (bulge in wire).
– Test DC output:
1. Disconnect wire from harness to isolate.
2. Meter to DC volts, black lead to engine ground, red to stator lead.
3. Start engine and throttle up. Expect 13–30 VDC (unregulated).
– If 0–1 V is seen, diode may be shorted/open. Test diode:
– Meter on diode check or ohms. Should conduct one way only.
– Replace the diode/wire if shorted/open.
C) Starter-generator (belt-driven)
– Check belt tension and condition first.
– With engine running at fast idle, measure battery voltage; if no charge:
– Inspect field wiring, voltage regulator box, and grounds.
– Generator test: With proper procedure per manual, full-field momentary test can verify output—use caution or defer to a pro.
Phase 2: Voltage Regulator/Rectifier Testing
If the stator produces correct AC but battery voltage stays ~12.6 V:
- Confirm regulator ground:
– The regulator body must be well-grounded to the engine/frame. Clean mounting surface and add a star washer. - Input/output check:
– With engine running and regulator plugged in, back-probe input pins: you should see AC from stator. Output pin to battery should be ~13.8–14.5 V DC at full throttle. - Overcharging symptom:
– Battery voltage >15 V indicates a failed regulator—replace immediately to avoid battery damage.
Note: Regulators are common failure points on Briggs & Stratton 10–20A systems and Kohler/Kawasaki equivalents.
Phase 3: Wiring, Switches, and Loads
- Key switch:
– Some mowers route charging through the ignition switch. Check continuity on the charge circuit (L to B or A to B per wiring diagram).
– If no continuity with key ON/RUN, replace the switch. - PTO clutch/headlights:
– A shorted PTO clutch coil can drag down the system. Disconnect PTO clutch connector and re-test charging.
– Turn off headlights and test again; check for chafed wires. - Fuse and solenoid junction:
– Verify the charge lead from regulator to battery positive side has an intact fuse and solid connection at the solenoid battery post.
Method 4: Component Replacement and Final Verification
Diagnosing the Issue
Time: 30–90 minutes depending on part
Tools: Socket set, flywheel puller (for stator), torque wrench, service manual
Fix Steps
- Replace voltage regulator/rectifier:
– Disconnect battery negative.
– Unplug old unit, clean mount, install new regulator with heat sink facing out, ensure tight ground.
– Reconnect wires per color coding. - Replace stator (two-wire systems):
– Remove engine shroud and flywheel nut.
– Use proper flywheel puller—do not pry.
– Replace stator, route wires correctly, apply threadlocker where specified, and torque flywheel nut to spec (commonly 55–110 ft-lb, check manual). - Replace diode lead (single-wire):
– Swap the harness or cut/crimp with a new diode-rated lead observing polarity and heat-shrink protection. - Replace/adjust alternator belt (starter-generator systems):
– Set correct deflection (~1/2 inch) and align pulleys.
Testing
- Reconnect battery, start engine, full throttle:
- Verify 13.4–14.6 V at the battery.
- Turn on lights and engage PTO; voltage should remain above ~13.2 V at high throttle.
- After a 10–15 minute mow, recheck battery voltage and warmth. Excess heat or smell suggests overcharging—reinspect regulator ground and output.
How to Prevent Future Charging Issues
- Keep connections clean: Inspect and clean battery posts, grounds, and regulator mount every season.
- Protect wiring: Zip-tie away from hot/moving parts; replace brittle or oil-soaked insulation.
- Maintain belts and pulleys: Proper alternator/generator belt tension prevents slippage.
- Store the battery smartly: Use a 1–2A smart maintainer during off-season; avoid deep discharges.
- Run at full throttle while mowing: Many systems only charge properly at higher RPM.
- Replace the fuse with correct rating only: Oversized fuses can mask shorts and damage components.
- Keep the engine cooling fins clear: Overheating can shorten regulator life.
Pro Tips
- Always test at full throttle. Low RPM can imply “no charge” when the system is fine.
- Use a star washer under the regulator’s mounting bolt to ensure a biting ground through paint.
- If you see 30–70 VAC from a two-wire stator but 12.6 V at the battery, 9 times out of 10 the regulator is the culprit.
- A parastic draw test (ammeter in series with negative cable, key off) should be near zero on most mowers. Anything above ~0.05A suggests a drain—check accessories and the key switch.
- Label every connector before disassembly; take photos for routing around the flywheel and shroud.
- If batteries “boil” or smell like sulfur, stop using the mower—overcharge damages plates quickly.
- Choose a garden tractor battery with 230–350 CCA and 28–35 Ah for typical riders; an undersized battery won’t buffer charging spikes well.
Professional Help
- When to call a pro:
- No AC output from stator and you’re not equipped for flywheel removal.
- Starter-generator systems needing regulator calibration or full-field testing.
- Repeated regulator failures (may indicate poor grounds or wiring defects).
- Choosing a service provider:
- Look for shops experienced with your engine brand (Briggs & Stratton, Kohler, Kawasaki).
- Ask if they perform charging system diagnostics (stator/regulator tests) rather than “parts swapping.”
- Typical costs:
- Diagnostic: $50–$120
- Voltage regulator: $30–$90 parts; $50–$120 labor
- Stator replacement: $60–$180 parts; $120–$250 labor
- Battery: $40–$120
- Warranty considerations:
- Many OEM regulators and stators carry 90-day to 1-year warranties. Keep receipts and avoid modifying wiring to preserve coverage.
FAQ
Q: What should battery voltage be on a running riding mower?
A: At full throttle, you should see 13.4–14.6 V at the battery. Anything near 12.6 V indicates no charge, while over 15 V indicates overcharging.
Q: How do I know if the voltage regulator is bad?
A: If the stator produces proper AC voltage but the battery stays at ~12.6 V or climbs above 15 V, the regulator/rectifier is bad. Also check that its case is well-grounded.
Q: Can a bad battery cause no charging?
A: Yes. A severely sulfated or shorted battery can prevent proper charging and may overwork or damage the regulator. Always test or swap in a known-good battery first.
Q: My fuse keeps blowing—what’s the cause?
A: Short circuits on the charge lead, chafed wires, a failed regulator, or a shorted PTO clutch can blow the fuse. Inspect wiring harnesses along the frame and around the engine.
Q: Do I need to remove the flywheel to check the stator?
A: No to test output—measure at the stator connector. Yes to replace the stator or repair damaged wires underneath; use a proper puller and torque the flywheel on reassembly.
Q: Is it normal for voltage to drop at idle?
A: Slightly, yes. Many systems don’t charge well at idle. Always test at full throttle for an accurate assessment.
Q: My mower only charges when headlights are off—why?
A: The charging system may be marginal. Check stator output and regulator health. Headlights add load that can drop voltage if output is weak or wiring has high resistance.
Q: How often should I replace the battery?
A: Most riding mower batteries last 3–5 years with proper maintenance and winter charging. Replace earlier if it fails load testing or won’t hold 12.4+ V after a full charge.
Alternative Solutions
Sometimes a repair isn’t cost-effective, especially on older machines with multiple failing components. Consider these options:
| Solution | Pros | Cons | Best For |
|---|---|---|---|
| Replace regulator only | Quick, inexpensive fix | Won’t help if stator is bad | Regulator failure with good AC output |
| Replace stator + regulator | Restores full system | More labor; higher cost | Older mowers with burned plugs/corroded stator |
| Add battery maintainer | Extends battery life | Doesn’t fix charging while running | Seasonal users or light mowing |
| Upgrade to higher-amp regulator (OEM-compatible) | Better support for lights/PTO | Must match stator rating | Users running accessories |
| New mower/battery bundle | Fresh start, warranty | Highest cost | Repeated failures on very old units |
Get Your Riding Lawn Mower Working Again
By following this guide, you now have a clear path to resolve a riding lawn mower battery not charging:
– Quick fixes: clean/tighten terminals, verify fuse, check grounds and belts
– Diagnostic tests: battery health, running voltage, stator AC output, regulator DC output
– Component repairs: regulator replacement, stator/diode harness repair, wiring and switch checks
– Prevention: seasonal maintenance, smart charging, and solid grounds
Don’t let a dead battery stall your yard work. Start with the simple checks, confirm charging system output at full throttle, and replace only what testing proves faulty. You’ll restore reliable starting and charging—and extend your mower’s life.
Have you fixed your mower’s charging issue? Share what worked in the comments to help other readers troubleshoot faster. Found this helpful? Bookmark it for your next maintenance day!


