

If your lawn feels like a sponge underfoot or water pools stubbornly after rain, that hidden thatch layer could be suffocating your grass—and a lawn dethatcher is the precise tool you need to fix it. Thatch isn’t just dead grass; it’s a dense mat of roots, stems, and debris that blocks water, nutrients, and oxygen from reaching soil. When this layer exceeds ½ inch thick, it transforms from protective blanket to suffocating barrier. Understanding what a lawn dethatcher is and how to use it properly separates patchy, struggling turf from the thick, resilient lawn you deserve. This guide cuts through the confusion with actionable steps, equipment recommendations, and grass-specific techniques proven to revive your lawn.
Dethatcher Defined: Your Lawn’s Thatch-Eliminating Solution
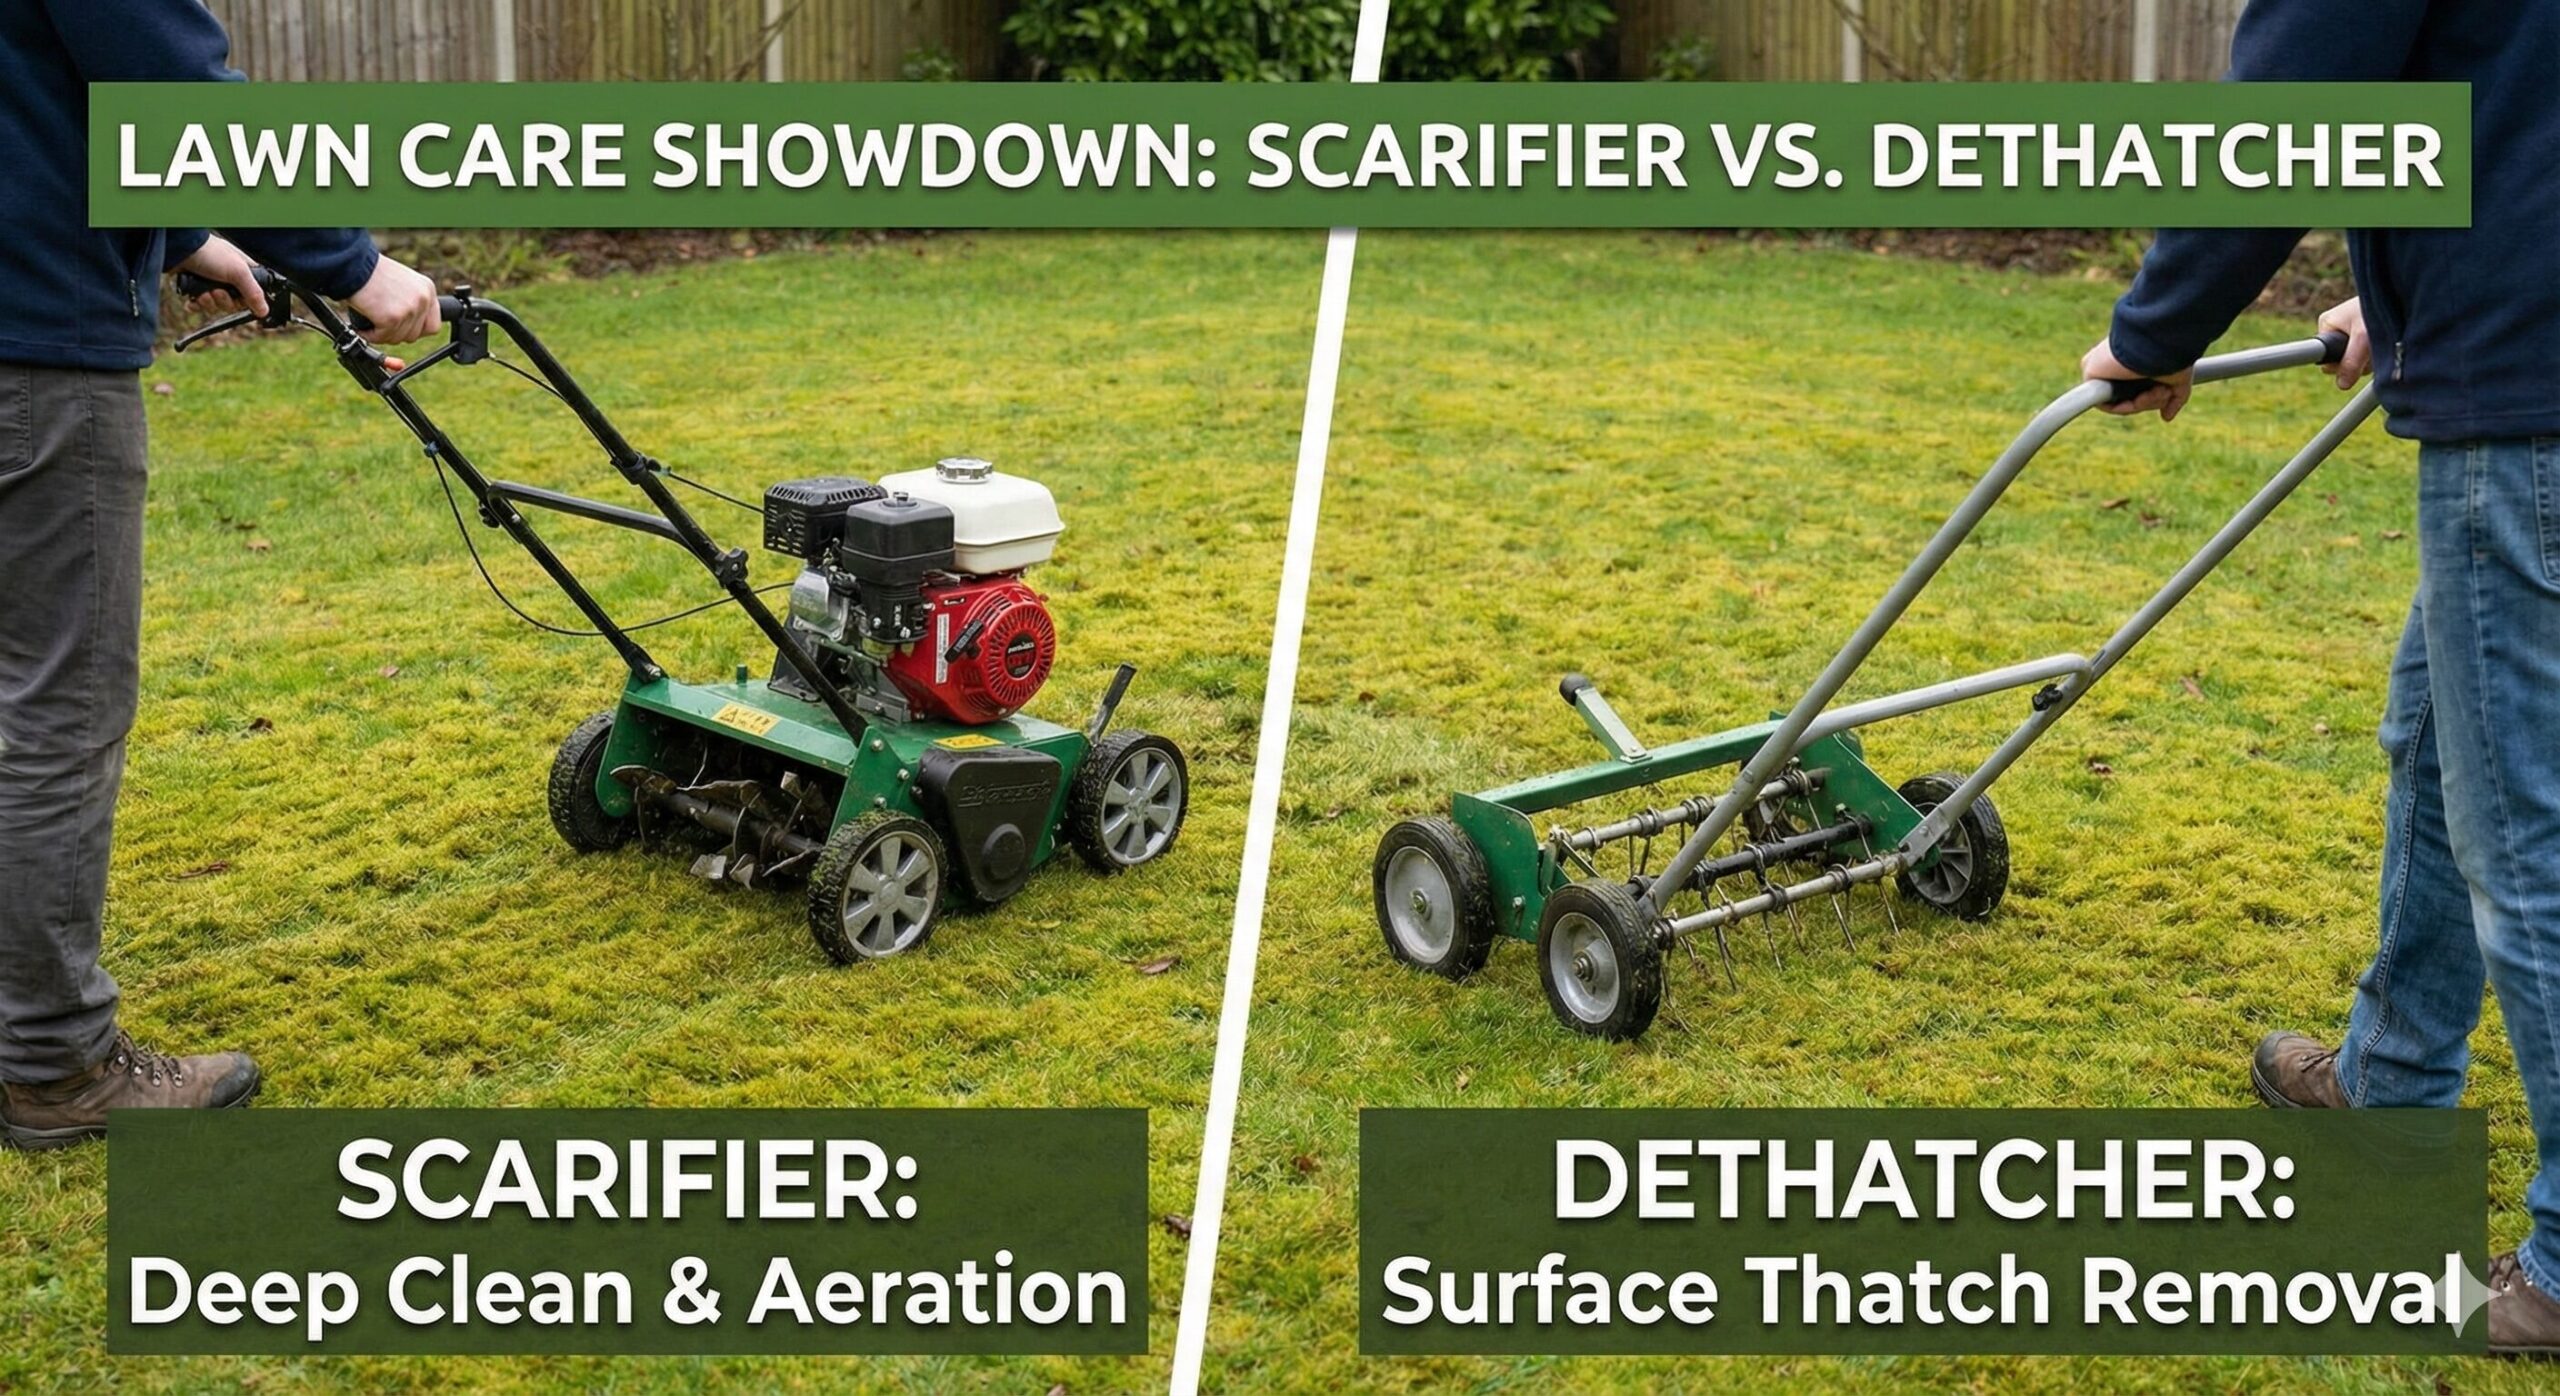
A lawn dethatcher is a specialized tool—manual, electric, or gas-powered—that slices vertically through thick thatch layers to pull dead material to the surface. Unlike aerators that relieve soil compaction by removing soil plugs, dethatchers target the organic mat above the soil. Its core mechanism uses rotating vertical blades, tines, or flails that penetrate just below the thatch layer, severing connections and lifting debris without destroying healthy grass crowns. For lawns plagued by spongy turf or poor fertilizer response, this tool isn’t optional—it’s essential surgery for lawn recovery. When thatch exceeds ½ inch, it physically blocks water infiltration, harbors pests, and forces roots to grow in the thatch instead of soil, making grass vulnerable to drought and disease.
How Dethatchers Slice Through Thatch: The Vertical Blade Mechanism

Dethatchers work by aggressively disrupting the thatch layer through vertical action. As the machine moves across your lawn, its rotating drum equipped with rigid steel blades or curved tines digs ¼ to ½ inch into the soil surface. This vertical slicing severs the dense network of dead roots and stems, while the outward rotation of the drum pulls the debris upward. The process creates thousands of tiny channels in the turf, immediately improving airflow and water penetration. Crucially, the blades must be set shallow enough to avoid scalp damage—ideally just piercing the soil surface. Pro Tip: Test depth settings on a small inconspicuous area first; you should see soil particles mixed with the pulled-up thatch, not large chunks of turf.
Why Vertical Action Beats Raking for Thick Thatch
- Manual rakes only skim the surface, failing to penetrate dense layers
- Power dethatchers reach the root-thatch interface where damage occurs
- Vertical slicing creates immediate pathways for water/nutrients
- Turf recovery is faster since crowns remain intact below the cut
Spotting Thatch Trouble: 5 Clear Signs You Need a Dethatcher
Don’t guess whether your lawn needs dethatching—use these field-tested indicators. Walk across your turf barefoot: if it feels unnaturally springy or spongy (like a mattress), thatch is likely over ½ inch thick. Check drainage after watering; standing water that lingers beyond 30 minutes signals thatch blocking infiltration. Visually inspect problem areas for discolored, anemic grass that fails to green up after fertilizing. Most reliably, perform the Trowel Test: cut a 3-inch deep wedge of turf, then measure the brown, fibrous layer between green grass and soil. Action Step: If this layer exceeds ½ inch (the width of a pencil), schedule dethatching immediately—delaying risks permanent lawn damage.
Choosing Your Dethatcher: Right Tool for Lawn Size and Grass Type
Small Lawns (Under 5,000 sq ft): Manual and Electric Options
For modest yards, a stiff-tined dethatching rake ($25-$75) works for light thatch under ½ inch. For thicker buildup, an electric power dethatcher ($200-$600) delivers consistent results with minimal effort. These corded or battery models cover 10,000 sq ft per hour and won’t damage sensitive grasses when set shallowly. Critical Warning: Never use gas-powered dethatchers on St. Augustine lawns—opt for a verticutter instead to avoid destroying its delicate runners.
Large Lawns (5,000+ sq ft): Gas-Powered Efficiency
For quarter-acre properties and beyond, gas-powered walk-behind dethatchers ($150-$800) provide the necessary muscle. Set blades to ¼-inch depth for cool-season grasses like fescue, making crisscross passes for full coverage. On Bermuda or Zoysia lawns, you can safely increase depth to ½ inch during late spring dethatching. Pro Tip: Rent commercial tow-behind models ($75-$125/day) if you own a riding mower—these handle 15,000+ sq ft per hour with minimal fatigue.
Your Step-by-Step Dethatching Plan: Timing, Technique, and Recovery
Perfect Timing for Your Grass Type
Cool-season lawns (bluegrass, ryegrass): Early fall is prime time—dethatch 2-3 weeks before first frost. This allows 4-6 weeks of recovery before winter dormancy. Warm-season lawns (Bermuda, Zoysia): Target late spring when soil hits 55°F+ and grass is actively growing. Absolute Rule: Never dethatch St. Augustine—use light verticutting (1/8-inch depth) instead to avoid crown damage.
Execute Flawless Dethatching in 4 Critical Steps
- Prep Smart: Mow lawn 1/3 shorter 2 days pre-dethatching. Water deeply the night before—soil should feel moist but not muddy. Mark sprinkler heads with flags.
- Set Depth Correctly: Adjust tines to just graze soil surface (¼” for cool grasses, ½” for Bermuda). Blades should pull up soil particles with thatch.
- Make Strategic Passes: Complete first pass north-south, then second pass east-west. Overlap rows by 50% for even coverage.
- Remove Debris Immediately: Rake or bag all thatch within 24 hours. Left on turf, it re-seeds new thatch growth.
Post-Dethatching Lawn CPR: Preventing Recovery Failures
Water deeply within 1 hour—1 inch of water saturates soil and reduces shock. Apply a balanced starter fertilizer (NPK 4:1:2) to fuel regrowth, then overseed bare spots exceeding 10% coverage. For 3 weeks, water lightly twice daily until new growth appears, but avoid foot traffic—even light walking can rip up recovering roots. Critical Mistake to Avoid: Skipping immediate thatch removal. Piled debris creates shade that kills emerging grass shoots.
Dethatching vs. Aeration: When to Use Which Tool
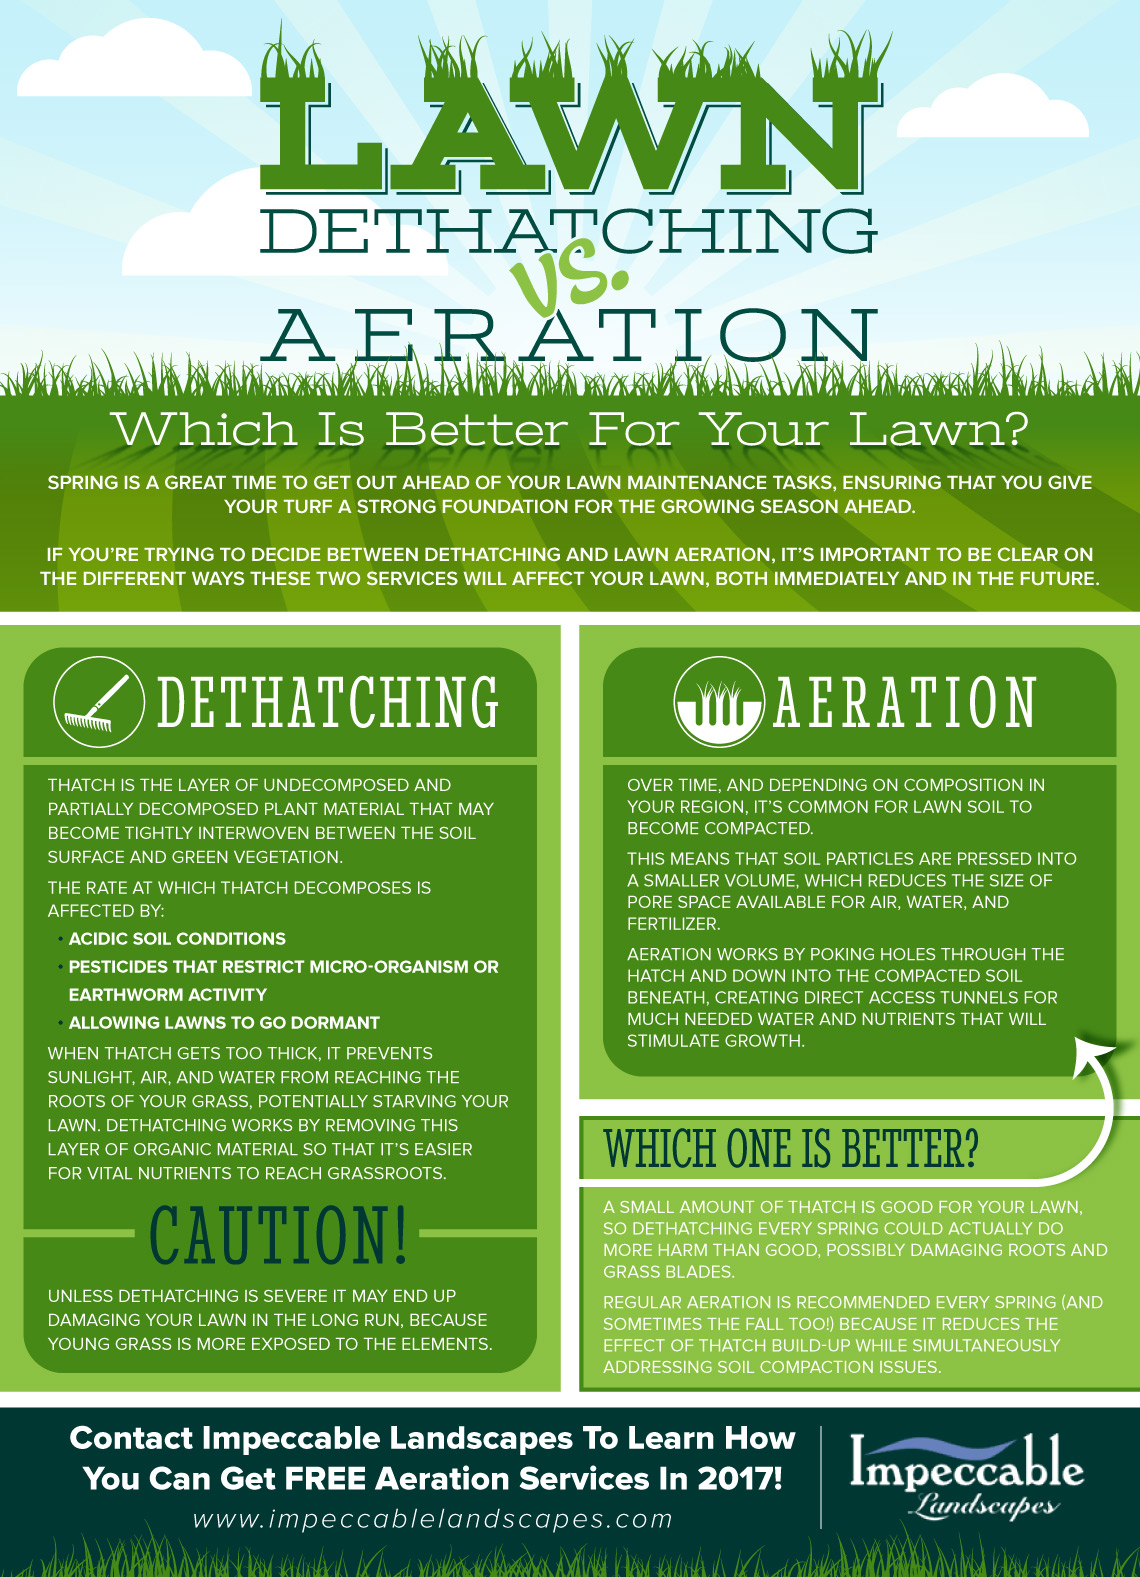
Confusing these processes wastes time and money. Dethatch only when thatch exceeds ½ inch—it removes organic debris above soil. Aerate only for compacted soil—it pulls plugs from soil to improve root growth. Your lawn may need both, but never simultaneously. Sequence Rule: Dethatch first, then aerate 2-4 weeks later once turf recovers. If your soil fails the screwdriver test (can’t push 3+ inches deep), prioritize aeration over dethatching—compaction often causes thatch buildup.
Cost-Saving Pro Tips for DIY Dethatching Success
- Rent smarter: Choose Saturday morning rentals to avoid weekday rush fees
- Debris disposal hack: Load thatch into mower bag, then compost it—it’s pure organic matter
- Prevent regrowth: After dethatching, apply liquid humic acid to boost microbial thatch decomposition
- Frequency secret: Most lawns need dethatching only every 2-3 years if you maintain proper mowing height (never cut below 3 inches)
When to Call a Lawn Care Professional
While DIY works for most yards, hire experts for lawns over ½ acre where equipment rental costs exceed $300. Seek professional help for St. Augustine or Centipede grass—specialized verticutting requires calibrated equipment. Also consider pros if your lawn shows severe thatch (over 2 inches) or steep slopes where manual dethatching risks injury. Quality services ($400 average for ¼ acre) include debris removal and overseeding—worth the investment when your lawn’s health is at stake.
A properly dethatched lawn breathes easier, drinks water efficiently, and develops deeper roots that resist drought. By using the right tool at the right time for your grass type, you transform a choked, spongy yard into dense, resilient turf. Remember: dethatching isn’t maintenance—it’s lawn triage for thatch emergencies. Pair it with annual core aeration and proper mowing (never removing more than 1/3 of blade height), and your lawn will naturally resist thatch buildup. Start with the Trowel Test this weekend—if thatch exceeds ½ inch, your dethatcher is waiting to revive your lawn.
![How To Use a Lawn Mower Blade Removal Tool [2026 Guide]](https://bestlawnmower.reviews/wp-content/uploads/2026/04/Lawn-Mower-Blade-Removal-Tool-300x169.png)
![What Does a Lawn Dethatcher Do: [Explained 2026]](https://bestlawnmower.reviews/wp-content/uploads/2026/04/Lawn-Dethatcher-copy-300x169.png)