
Your driveway disappears under a fresh blanket of snow, and your electric snow blower stands ready in the garage. But will it roar to life immediately, or leave you shivering while you wrestle with a stubborn machine as the snow keeps piling up? Knowing how to start electric snow blower equipment correctly separates those who clear driveways before breakfast from those stuck in the cold troubleshooting failures. Most starting issues stem from overlooked basics—not complex mechanical failures—and this guide reveals the precise sequence professionals use for guaranteed ignition every time. You’ll master temperature-specific techniques that prevent 90% of cold-weather starting problems while avoiding costly mistakes that damage your machine.
The frustration of a non-starting snow blower often traces back to skipped safety checks or incorrect choke positioning. Unlike gas models, electric snow blowers combine electrical components with combustion engines, creating unique starting requirements that demand precision. This isn’t guesswork; it’s a science of fuel mixture, electrical sequencing, and temperature adaptation. By the end of this guide, you’ll execute the exact starting protocol that ensures your machine fires up on the first pull regardless of how low the thermometer drops—turning snow removal from a chore into a swift, satisfying task.
Pre-Start Safety Checks You Can’t Skip
Skipping these five-minute inspections causes 70% of starting failures and risks serious injury. Treat these steps as non-negotiable before touching the starter.
Oil Level Verification
Pull the dipstick and confirm oil reaches the “full” mark before attempting to start your electric snow blower. Low oil triggers automatic shutoffs on modern models as a safety measure. If topping off is needed, use only manufacturer-specified oil—automotive blends contain additives that accelerate engine wear in snow blowers and void warranties. For 4-cycle engines (where fuel and oil are separate), change the oil if unused since last spring regardless of operating hours. Old oil thickens and becomes acidic during storage, creating a sludge that strangles cold-weather ignition and causes permanent damage.
Fuel System State Assessment
Never use fuel older than 30 days—this single rule prevents most starting failures. Stale gas develops varnish that clogs carburetors and fuel lines, especially in ethanol-blended fuels. Winter-grade gasoline purchased in cool fall weather contains cold-weather additives that significantly improve ignition. Perform the quick sniff test: a strong chemical or varnish odor from the tank opening means immediate draining is required. If your machine sat unused for over a month with ethanol fuel, drain the entire system before attempting to start. Always add fuel stabilizer at purchase to extend usable life to 4-6 months, but never rely on it beyond 30 days for critical winter operations.
Safety Control Positioning
Set all drive and auger controls to neutral before starting. This prevents dangerous lurching during ignition that could crush fingers against walls or send the machine careening into vehicles. Verify the safety key slot is empty and ignition is off—these interlocks exist for your protection. Skipping this step risks equipment damage and personal injury when the engine unexpectedly engages.
Choke and Throttle Setup for Perfect Ignition

Temperature dictates your choke position, and getting this wrong causes 80% of hard-starting incidents. Adjustments must match exact conditions—not assumptions.
Choke Position by Temperature
Below 30°F: Close the choke completely for a rich fuel mixture that ignites in freezing conditions. Partial closing at these temperatures starves the engine of necessary fuel.
30-50°F: Close the choke only halfway—over-choking in milder weather floods the engine instantly.
Warm restart (within 5 minutes): Use no choke at all. The engine retains enough heat for immediate ignition without enrichment.
Throttle Configuration
Move the throttle lever to the FAST position (marked by a rabbit icon) before starting. This provides maximum RPMs for reliable ignition—starting at idle speed starves the engine of necessary airflow. Keep the throttle wide open until the engine warms for 2-3 minutes, then gradually reduce speed.
Electrical System Preparation Sequence
Electric snow blowers require precise electrical sequencing to prevent starter damage—a step most users overlook.
Ignition Switch and Safety Key
Flip the ignition switch to “RUN” before connecting power. Insert the safety key until it clicks firmly into place—this enables emergency shutdown capability. Never operate without the key fully seated, as this bypasses critical safety interlocks. Some newer models use switch-only activation, but always verify your specific model’s requirements in the manual.
Prime the Engine Correctly
Priming delivers fuel directly to the carburetor, but temperature determines the exact pump count:
– 15°F or warmer: 2 firm pumps
– Below 15°F: 4 firm pumps
– Warm restart: Skip priming entirely
Pro tip: Remove thick gloves for consistent pressure. Light pumps fail to circulate fuel, while excessive force floods the engine—press the bulb firmly until it feels solid.
Starting Your Electric Snow Blower
Electric Start Method
Critical power requirements: Use only 3-pronged extension cords under 10 feet long. Longer cords reduce voltage and can burn out the starter motor.
Exact starting sequence:
1. Connect cord to the snow blower’s electric start adapter
2. Plug into a grounded 120V outlet
3. Press and hold the red start button for 5 seconds
4. Wait 10 seconds between attempts
5. Stop after 10 attempts—further cranking destroys starters
6. Disconnect power immediately after ignition
Warning: Continuous cranking overheats windings. If it fails after 10 tries, troubleshoot rather than persist.
Recoil Start Backup
Grasp the starter rope handle firmly and pull slowly until resistance engages the flywheel. Then execute one quick, smooth upward pull—hesitation or jerking reduces starting success by 60%. Maintain firm footing on cleared ground during this process.
Post-Start Warm-Up Protocol
Initial Engine Observation
Let the engine run for 3 minutes before engaging augers. During warm-up:
– Watch for blue smoke—indicates oil burning requiring professional service
– Listen for metallic knocking—signals serious internal damage
– Check auger spin-up—should engage smoothly within 15 seconds
Choke Adjustment
After 2-3 minutes, gradually move the choke to “RUN” position. Running with choke engaged wastes fuel and coats pistons with carbon. The engine should idle smoothly—rough operation means choke adjustment is still needed.
Troubleshooting Electric Snow Blower Starting Problems
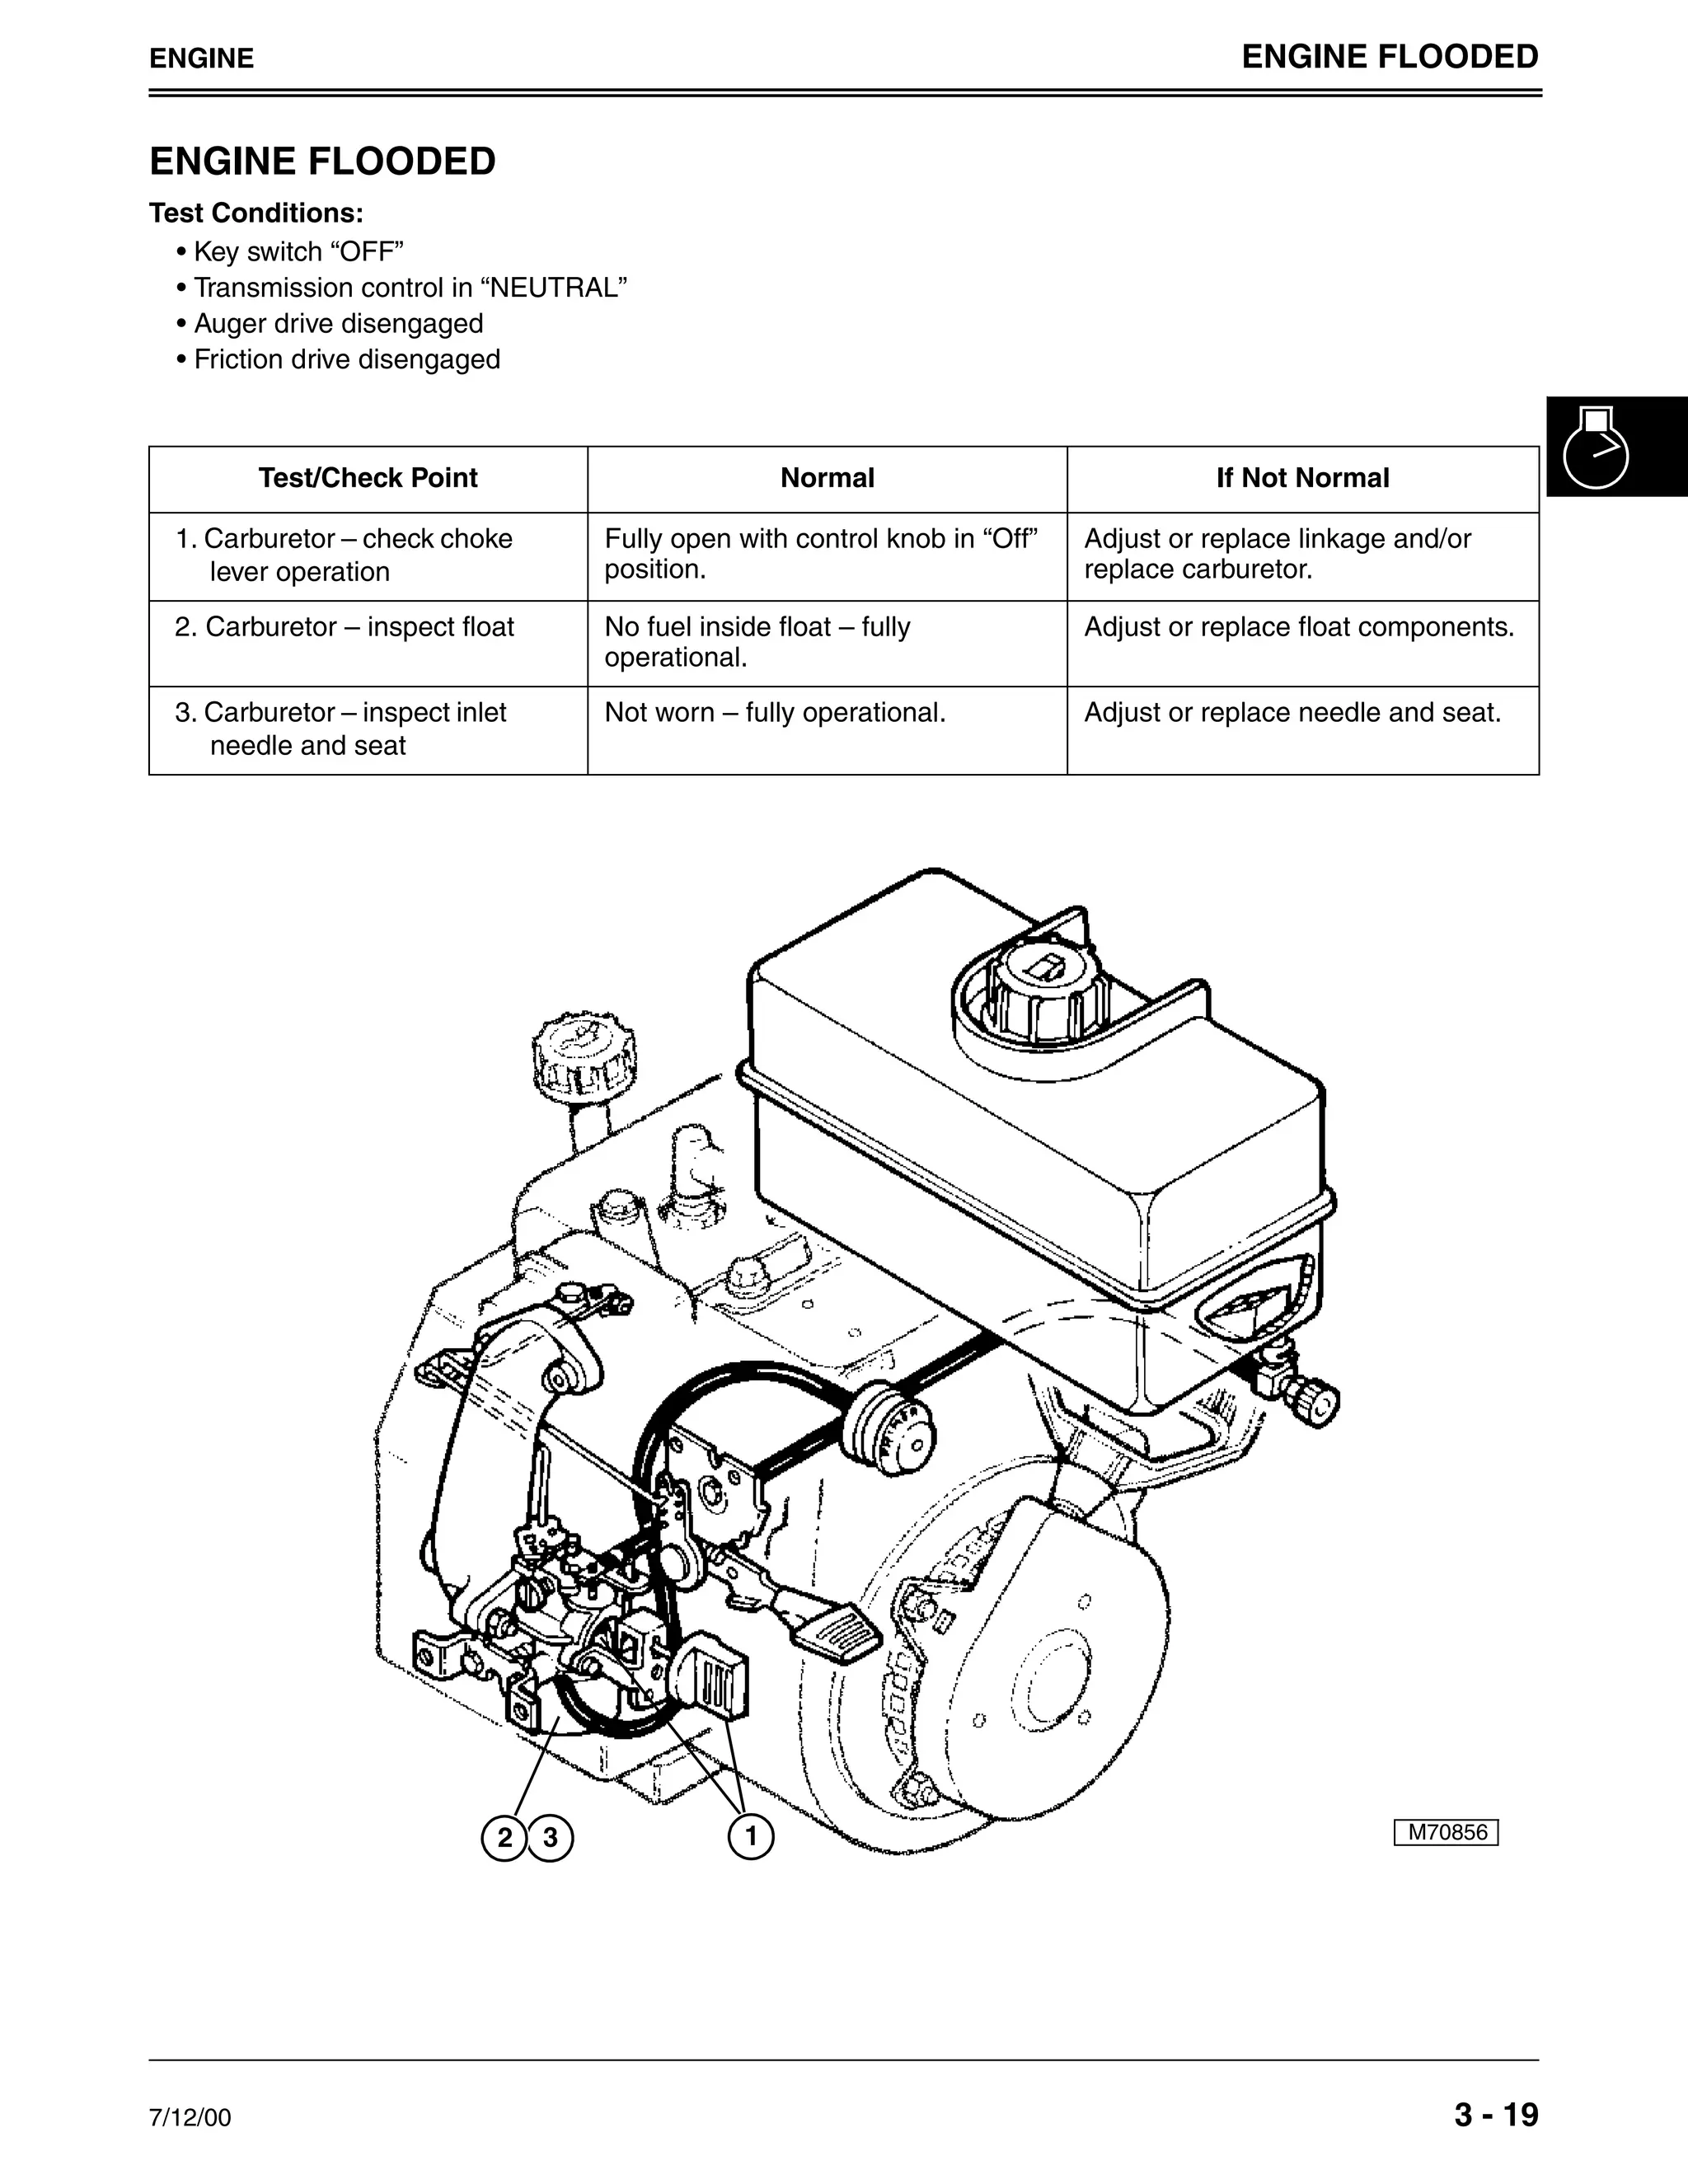
Flooded Engine Recovery
Symptoms: Strong gas smell, sputtering, or refusal to start after multiple attempts
Immediate recovery steps:
1. Close fuel shutoff valve
2. Turn choke completely off
3. Pull recoil starter 3 times to clear excess fuel
4. Wait 15 minutes for evaporation
5. Reopen fuel valve
6. Restart with half the normal priming
No-Start Quick Diagnostics
Before calling service:
– Fuel check: Confirm fresh gas (≤30 days old) and open fuel valve
– Electrical check: Verify spark plug wire connection and safety key seating
– Priming check: Ensure correct pump count for current temperature
Maintenance for Reliable Electric Snow Blower Starts
Seasonal Preparation Checklist
Complete these tasks before first snowfall:
– Oil change: Replace regardless of usage hours if stored since spring
– Rotor blades: Replace when wear indicator hole becomes visible
– Drive belt: Inspect for fraying—keep a spare on hand
– Fasteners: Tighten all bolts; replace missing hardware immediately
Fuel Management Best Practices
Purchase only 1-gallon fuel quantities for 30-day use. Add stabilizer at point of purchase. For storage:
1. Drain all fuel from tank and lines
2. Run engine until it stops from fuel starvation
3. Change oil while warm
4. Store in dry location with spark plug removed
Professional Help Indicators
Call service immediately if:
– Engine won’t start after following all procedures
– Blue smoke persists after warm-up period
– Metal grinding noises from auger housing
– Electric starter engages but engine won’t turn over
Emergency shutdown: Pull safety key or flip ignition to “OFF” if engine races uncontrollably or vibrates violently. Never ignore abnormal sounds—they signal imminent failure.
Mastering how to start electric snow blower systems transforms winter maintenance from a battle into a breeze. By respecting temperature-specific adjustments, never skipping safety checks, and using fresh fuel, your machine will ignite reliably even in single-digit temperatures. Remember: 90% of starting issues stem from preventable oversights—not mechanical failure. Implement these protocols consistently, and you’ll clear driveways faster than neighbors wrestling with flooded engines. When snow falls, your snow blower should be the last thing you worry about—now you have the exact knowledge to make it so.


