

If your Craftsman riding lawn mower won’t start, you’re not alone—and it’s frustrating, especially when the grass is growing fast. The good news: many no-start issues have simple fixes. Start with the basics—check the battery connections, ensure the parking brake is set, blades are disengaged, and try a fresh fuel prime or a battery jump. These quick checks solve a surprising number of problems.
In this guide, you’ll get a complete troubleshooting roadmap for a Craftsman riding mower not starting: the most common causes, step-by-step fixes from easiest to advanced, how to test each part, and how to prevent future starting issues. By the end, you’ll know exactly what to check, how to fix it, and when to call in a pro.
Common Causes of a Craftsman Riding Lawn Mower Not Starting
- Dead or weak battery
- Loose, corroded, or damaged battery cables
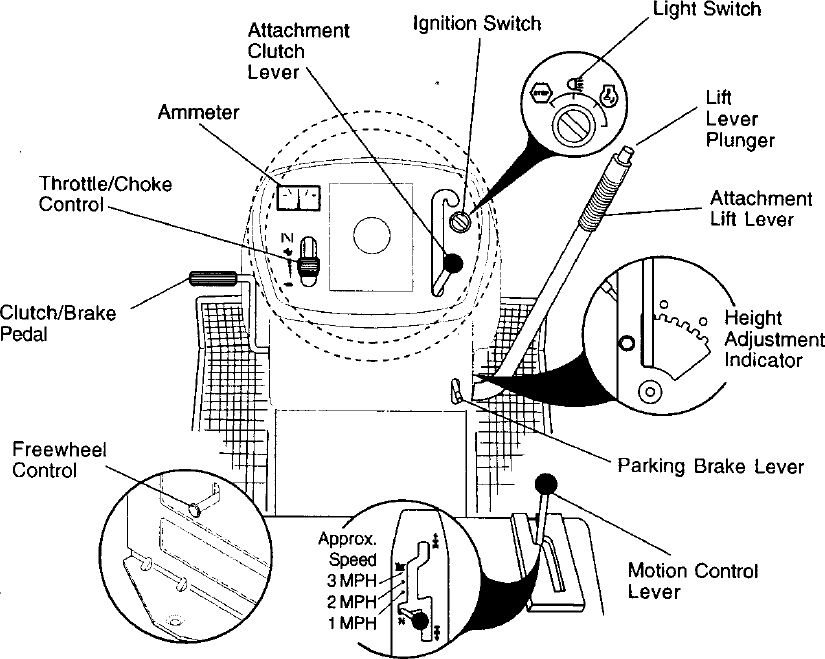
- Faulty ignition switch or key switch
- Bad safety switch (seat, brake, or blade/PTO switch)
- Blown fuse
- Stale fuel or fuel contaminated with water/ethanol separation
- Clogged fuel filter or fuel line
- Faulty fuel shutoff solenoid (on carburetor)
- Dirty or failing carburetor (gummed jets/float issues)
- Clogged air filter
- Bad spark plug or disconnected plug wire
- Faulty starter solenoid or starter motor
- Faulty coil/ignition module (no spark)
- Compression issues or hydro-lock (rare but possible)
How to Fix a Craftsman Riding Lawn Mower Not Starting
Work through these methods in order—from quickest to more advanced. Always follow safety precautions.
Important: Remove the key, set the parking brake, and disconnect the spark plug wire before touching belts or rotating parts. When testing starting systems, keep hands and tools clear of moving parts.
Method 1: Basic Checks and Quick Wins
Diagnosing the Issue
- Does the starter click? A rapid clicking often signals a weak battery or poor connection.
- Is there no sound at all? Think safety switches, ignition switch, fuse, or dead battery.
- Is the engine cranking but not firing? Likely fuel, air, or spark issues.
Fix Steps
- Verify safety positions:
– Parking brake engaged.
– PTO/blades disengaged.
– Sitting firmly on the seat (some models require weight on seat). - Check the fuel:
– Ensure at least half a tank.
– If fuel is older than 30–60 days, drain and refill with fresh unleaded gas (E10 or less), plus fuel stabilizer. - Inspect the air filter:
– Remove the cover and filter. If it’s clogged or soaked with fuel/oil, replace it. For paper filters, tap gently to release debris. Foam pre-filters can be washed and dried. - Check the spark plug connection:
– Make sure the plug wire is fully seated on the plug. If the plug is dirty or wet, replace it (typical plug: Champion RC12YC or equivalent—verify your model). - Check fuse:
– Look for an inline fuse near the battery or under the dash (often 15A–30A). Replace if blown. If it blows again, you have a short to track later. - Try starting:
– Use full choke on a cold engine. For warm starts, less choke. If flooded, open throttle fully and crank for 3–5 seconds.
Testing
- If the engine starts, let it run for 5–10 minutes. If it stumbles or dies, proceed to fuel and carb checks below.
Method 2: Battery and Electrical Connection Check
A weak battery is the most common reason a riding mower won’t start.
Diagnosing the Issue
- Symptoms: clicking noise, slow crank, dim lights, or no response.
- Tools: digital multimeter (DMM), wire brush, battery charger.
Fix Steps
- Inspect and clean terminals:
– Disconnect negative (black) first, then positive (red).
– Clean posts and clamps with a wire brush. Remove any white/green corrosion.
– Reconnect positive first, then negative. Tighten snugly. - Test battery voltage:
– Resting voltage should be 12.4–12.8V. Below ~12.2V is undercharged. - Charge the battery:
– Use a smart charger at 1.5–3A until it reaches 12.6–12.8V. This can take 2–6 hours. - Load test (optional):
– While cranking, voltage should stay above ~9.6–10.5V. If it drops lower, the battery may be bad. - Inspect cables and grounds:
– Check for frayed cables, loose grounds to frame/engine block, and damaged insulation.
Testing
- Try to start. If it cranks strongly but won’t fire, move to fuel/spark diagnostics. If still no crank, check ignition and safety switches.
Method 3: Ignition Switch, Safety Switches, and Starter Circuit
Safety interlocks prevent starting unless conditions are safe.
Diagnosing the Issue
- No crank at all, even with good battery.
- Intermittent starting depending on seat position, brake lever, or PTO switch.
Fix Steps
- Check seat switch:
– With PTO off and brake set, wiggle on the seat while turning the key. If it only cranks with pressure applied, the seat switch may be failing or out of alignment. - Brake/clutch switch:
– Ensure the pedal is fully depressed. Inspect the switch near the pedal linkage. Listen/feel for a click. Adjust or replace if loose/bad. - PTO/blade switch:
– Ensure the PTO is OFF. Toggle the switch a few times to clean contacts. Replace if suspected. - Test the key switch:
– Turn to “Start” and check for 12V output to the solenoid trigger wire (typically small wire on solenoid). No voltage suggests a bad ignition switch or safety switch interruption. - Check the fuse again:
– Replace any corroded fuse holder. A poor holder can cause intermittent no-start. - Starter solenoid test:
– Listen for a click from the solenoid when turning the key. No click could mean no trigger signal or a bad solenoid.
– With the brake set and blades off, you can briefly bridge the two large solenoid posts with an insulated screwdriver to test the starter motor. If the engine cranks when bridged, the starter is good and the issue is upstream (switches/solenoid). If it doesn’t crank, the starter or its ground/cable is suspect.
Warning: Bridging the solenoid creates sparks. Wear eye protection and ensure the mower is in neutral with brake engaged.
Testing
- After repairs, test start. If it now cranks but won’t fire, continue to fuel and spark checks.
Method 4: Fuel System—Fuel Flow, Filter, and Carburetor
Stale fuel and varnish cause most “cranks but won’t start” issues.
Diagnosing the Issue
- Cranks normally but won’t fire, or starts then dies.
- Primer bulb or choke has little effect.
- Fuel smell or backfiring through carb suggests mixture issues.
Fix Steps
- Replace old fuel:
– Drain tank using a siphon or by removing the fuel line at the filter. Refill with fresh gasoline (E10 max) and add stabilizer. - Check the fuel filter:
– If the filter looks dark or fuel flow is restricted, replace it. Arrow on filter should point toward carburetor. - Inspect fuel lines and shutoff:
– Replace cracked lines. Ensure any shutoff valve is open. Clear clogs by blowing compressed air backward (away from carb) with line removed. - Test fuel solenoid (if equipped):
– On the bottom of the carb, unplug the two-wire solenoid. Turn the key ON; you should feel/hear a click. If no click, check for 12V at the connector. If power is present but no click, replace the solenoid. - Clean the carburetor (quick method):
– Remove the air filter. Spray a small burst of carb cleaner into the carb throat. Try to start. If it fires briefly, the carb is dirty. - Carburetor bowl cleaning:
– Remove the fuel solenoid or bowl nut. Drain fuel, clean the bowl, main jet, and passages with carb cleaner. Reassemble with a new bowl gasket if needed. - Deep clean/rebuild (advanced):
– Remove carb, disassemble float and jets, soak in carb cleaner, blow out passages with compressed air, reinstall with a rebuild kit.
Important: Don’t overuse starting fluid—it can cause engine damage. Use carb cleaner sparingly for testing only.
Testing
- Prime the fuel system: open fuel valve, key ON to energize solenoid, wait 10–15 seconds. Choke and start. If it runs smoothly for >5 minutes, you’ve solved the fuel issue.
Method 5: Spark Plug and Ignition
Without strong spark, the engine won’t fire.
Diagnosing the Issue
- Engine cranks but no start; plug looks wet with fuel (flooded).
- Backfiring or rough running.
Fix Steps
- Inspect and replace spark plug:
– Remove the plug. Check for fouling, cracks, or worn electrode. Replace with the OEM spec (commonly Champion RC12YC or equivalent—confirm for your Briggs & Stratton, Kohler, or Craftsman engine model).
– Gap typically 0.030 in (0.76 mm)—verify engine spec. - Check spark:
– With the plug removed and connected to the plug wire, ground the plug threads to the engine block. Crank and look for a strong blue spark. Use an inline spark tester if available. - If no spark:
– Inspect the kill wire to the ignition coil (magneto). A shorted kill wire or faulty switch can ground out the coil.
– If kill wire is disconnected and there’s still no spark, the ignition coil may be bad. Replace coil and set the air gap to flywheel magnet (commonly 0.010–0.014 in; use a business card as a spacer if needed).
Testing
- Reinstall plug, reconnect wire, and attempt start. If it fires and runs, let it warm up for a few minutes.
Method 6: Starter Motor and Mechanical Checks
If you hear the solenoid click but the engine doesn’t crank, or it cranks very slowly:
Diagnosing the Issue
- Single click, no crank: bad solenoid, stuck starter, or seized engine.
- Slow crank: weak battery, high resistance in cables, or failing starter.
Fix Steps
- Tap the starter gently:
– Use a rubber mallet to tap the starter body while turning the key—can free stuck brushes temporarily. - Voltage drop test:
– Measure voltage at starter post while cranking. It should be close to battery voltage. A large drop indicates bad cables/solenoid. - Inspect the engine:
– Remove the spark plug and attempt to turn the engine by hand at the flywheel screen. If it won’t turn, check for hydro-lock (fuel in cylinder); crank briefly with plug out to expel fuel, then replace plug. - Replace the solenoid or starter as needed:
– If the starter receives full voltage but doesn’t spin, replace starter.
– If the solenoid doesn’t pass power despite a good trigger signal, replace solenoid.
Testing
- Reassemble and attempt a start. Ensure all safety switches function correctly.
How to Prevent Future Starting Issues
- Use fresh fuel and add stabilizer if storing >30 days.
- Run the engine monthly during the off-season to keep fuel fresh in the carb.
- Replace air filter every season or sooner in dusty conditions.
- Replace fuel filter annually.
- Keep battery on a trickle/maintenance charger over winter.
- Clean battery terminals each season; ensure solid grounds.
- Store the mower in a dry, covered area; keep rodents away from wiring.
- Perform annual tune-up: new plug, oil change, filter, blade sharpening, and deck clean.
Pro Tips
- Label and photograph wiring before removing components to ensure correct reassembly.
- When chasing intermittent no-crank, wiggle harnesses near the seat, brake, and PTO switches while turning the key—changes indicate a failing switch or connector.
- Use dielectric grease on electrical connectors after cleaning to prevent corrosion.
- If ethanol fuel is unavoidable, use stabilizer rated for ethanol and don’t store fuel longer than 60 days.
- Install a manual fuel shutoff valve (if not equipped) and close it during storage to prevent carb flooding.
- If the engine floods, set throttle wide open (no choke) and crank 5–10 seconds to clear.
- Keep the model and engine numbers handy (e.g., Craftsman 917.xxxx; Briggs/Kohler model/type) for ordering exact parts.
When to Call a Professional
- You’ve verified battery, connections, fuse, and safety switches, but there’s still no crank.
- No spark even after replacing the plug and checking the coil and kill wire.
- Carburetor requires a full rebuild and you’re not comfortable with small parts and adjustments.
- Wiring harness damage or repeated blown fuses indicate shorts that need diagnostic tools.
- Starter replacement on some models requires belt or shroud removal you’re not equipped to handle.
Typical costs (may vary by region):
– Mobile diagnostic: $80–$150
– Carb cleaning/rebuild: $90–$180 plus parts
– Starter or solenoid replacement: $100–$250 parts and labor
– Ignition coil replacement: $80–$160
– Battery replacement: $40–$120
Warranty notes:
– Newer Craftsman mowers may have limited warranties. Electrical and carb issues due to stale fuel are usually not covered. Modifications can void coverage—check your owner’s manual.
FAQ
Q: My Craftsman mower only clicks when I turn the key. What now?
A: This usually means a weak battery or poor cable connection. Clean and tighten battery terminals, test voltage (should be 12.6V), and charge the battery. If voltage is good, the solenoid or starter may be failing—bridge the solenoid to test the starter.
Q: The engine cranks but won’t start—do I have a fuel problem?
A: Likely. Replace old fuel, check the fuel filter, ensure the fuel shutoff (if present) is on, and clean the carburetor bowl and jet. If it briefly runs on carb cleaner, the carb needs cleaning or a rebuild.
Q: How do I know if the seat switch is bad?
A: If the mower only cranks when you press down hard on the seat, or dies when you shift weight, the seat switch is misaligned or failing. Inspect the connector, ensure the switch is fully depressed when seated, and replace if needed.
Q: Should I use starting fluid?
A: Avoid ether-based starting fluid on small engines. Use a small burst of carburetor cleaner instead, and only for testing. Frequent use can damage the engine.
Q: What spark plug does my Craftsman mower use?
A: Many Briggs & Stratton engines use Champion RC12YC gapped at 0.030 in, but verify your engine model (stamped on the engine shroud) for the correct plug and gap.
Q: Why does my fuse keep blowing?
A: A short to ground in the wiring harness, chafed wires, or a failing component (e.g., PTO clutch) can blow fuses. Inspect for pinched or melted wires, especially around the frame and steering shaft. Replace damaged sections and ensure proper fuse rating.
Q: My mower starts and then dies after 5–10 seconds. What’s wrong?
A: This points to fuel starvation—clogged jet, stuck fuel solenoid, or blocked fuel filter/vent. Clean the carb bowl and main jet, verify solenoid clicks with key ON, and check that the gas cap vent isn’t blocked.
Q: The starter spins but doesn’t engage the engine. Help?
A: The Bendix drive on the starter may be sticking or worn. Clean the starter gear and flywheel teeth, avoid over-greasing (attracts dirt), and replace the drive if worn.
Alternative Solutions
If repeated issues persist or your mower is aging, consider these alternatives.
| Solution | Pros | Cons | Best For |
|---|---|---|---|
| Upgrade to a newer Craftsman with EFI | Easier starts, better fuel economy, fewer carb issues | Higher cost | Frequent users, ethanol-heavy regions |
| Switch to non-ethanol fuel (E0) | Prevents varnish, better long-term storage | Higher price, less available | Seasonal users storing fuel long periods |
| Battery upgrade (AGM) | Better cold cranking, less maintenance | Costlier than flooded lead-acid | Cold climates or infrequent use |
| Professional annual service plan | Preventive maintenance handled | Ongoing cost | Users wanting hassle-free ownership |
Get Your Craftsman Mower Working Again
Following this guide, you now have multiple solutions to fix a Craftsman riding lawn mower not starting:
– Quick checks: safety positions, fresh fuel, air filter, spark plug
– Battery and connection fixes, fuse inspection
– Safety switch, ignition switch, and solenoid testing
– Fuel system cleaning: filter, lines, carburetor, and solenoid
– Spark and ignition coil diagnostics
– Starter and mechanical checks
Don’t let a no-start derail your day. Work through the steps in order, and you’ll pinpoint the problem and get your Craftsman mower running again. Still stuck? Describe your symptoms and model/engine numbers in the comments for tailored advice.
Found this guide helpful? Bookmark it for future reference and share it with a neighbor who’s fighting the same issue. With a little patience, you’ll never deal with a Craftsman riding lawn mower not starting again.


